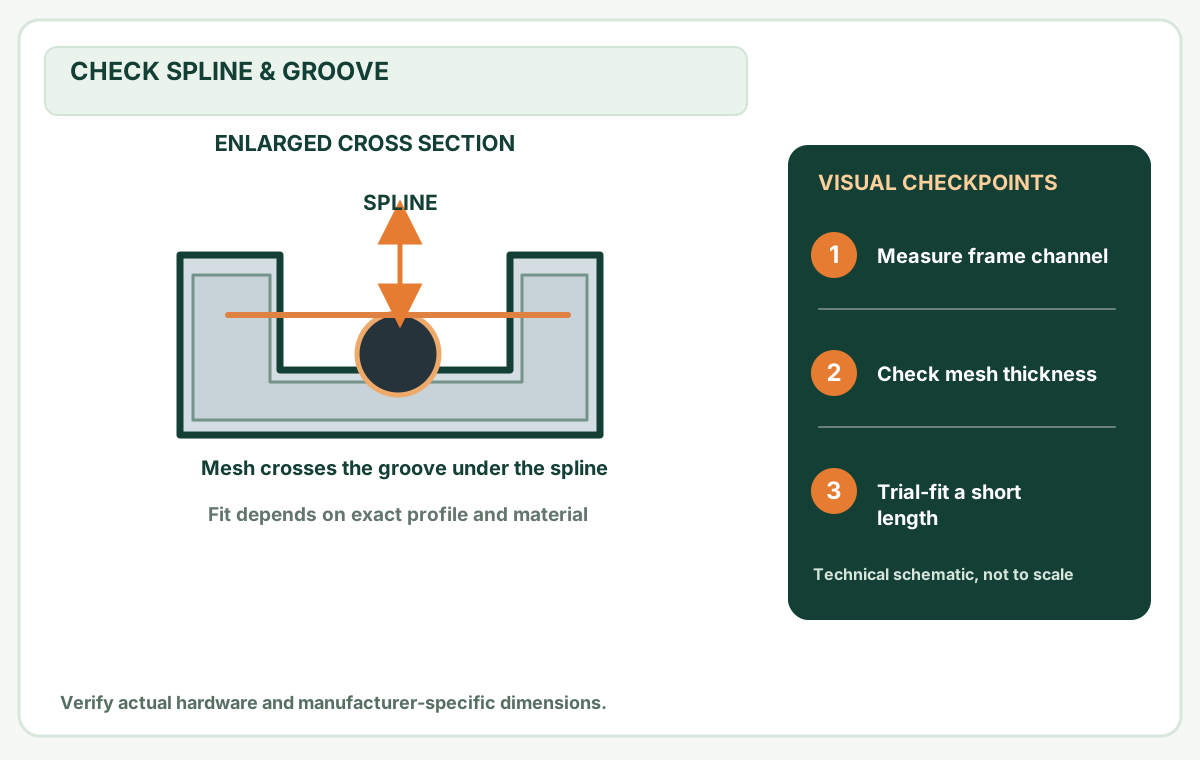
Keep the frame flat, use a compatible spline and avoid pulling mesh so tightly that you rack the frame.
Before you buy or repair
- Record first
- Frame condition, groove profile, mesh orientation and matching spline
- Make the decision
- Cut dimensions, straight supported work surface and even—not excessive—tension
- Stop & verify if
- The corners loosen, the frame distorts or a fragile panel cannot be safely supported
Jump to a section
- Diagram checkpoints
- Materials and work area
- Remove the old mesh without damaging the frame
- Cut mesh with working allowance
- Choose the mesh overhang from the actual installation method
- Choose the right roller face and installation sequence
- Install the spline
- Check the fit before reinstalling
- Troubleshooting: change one variable at a time
- Switching to a thicker PetScreen: confirm TWO independent product choices
- Multiple screens: choose stock width from actual cut rectangles
- Source
- After the project: did it work?
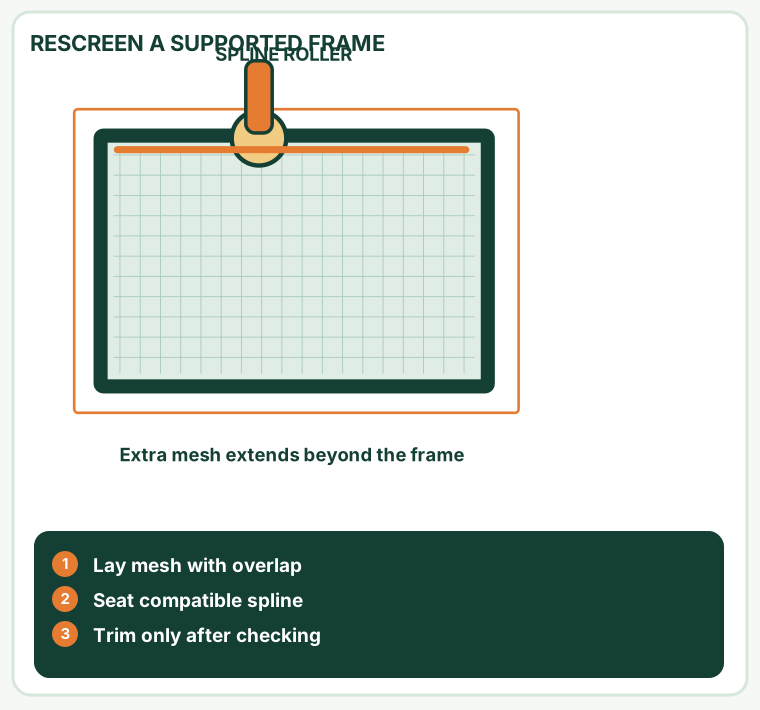
Open desktop diagram ↗ Open mobile diagram ↗
Read the diagram: three checkpoints
- Lay mesh with overlap
- Seat compatible spline
- Trim only after checking
If a screen frame is square, intact and still fits its opening, replacing torn fiberglass mesh is usually simpler than building a new frame. The steps below describe the common spline-and-groove frame. They do not apply to every proprietary window system.
Materials and work area
Prepare replacement fiberglass screen mesh, appropriately sized spline, a spline roller, scissors or a sharp utility knife, a tape measure and a flat stable work surface. Keep fingers away from the knife's cutting path. If the frame is sharp or has glass nearby, wear suitable protection and relocate the work to a safer area.
Before buying spline, inspect the old groove and use the mesh manufacturer's sizing recommendations; different material thicknesses may require different spline diameters.
Remove the old mesh without damaging the frame
- Take the screen out of its mounting track using the correct release method for your window.
- Lay the frame flat on a clean, stable work surface. Phifer describes holding the outside edges with tape while leaving the groove clear; use removable tape only where it will not damage the finish.
- Find the end of the existing spline and gently lift it with a suitable tool, taking care not to gouge the groove.
- Remove the old mesh and brush debris from the channel.
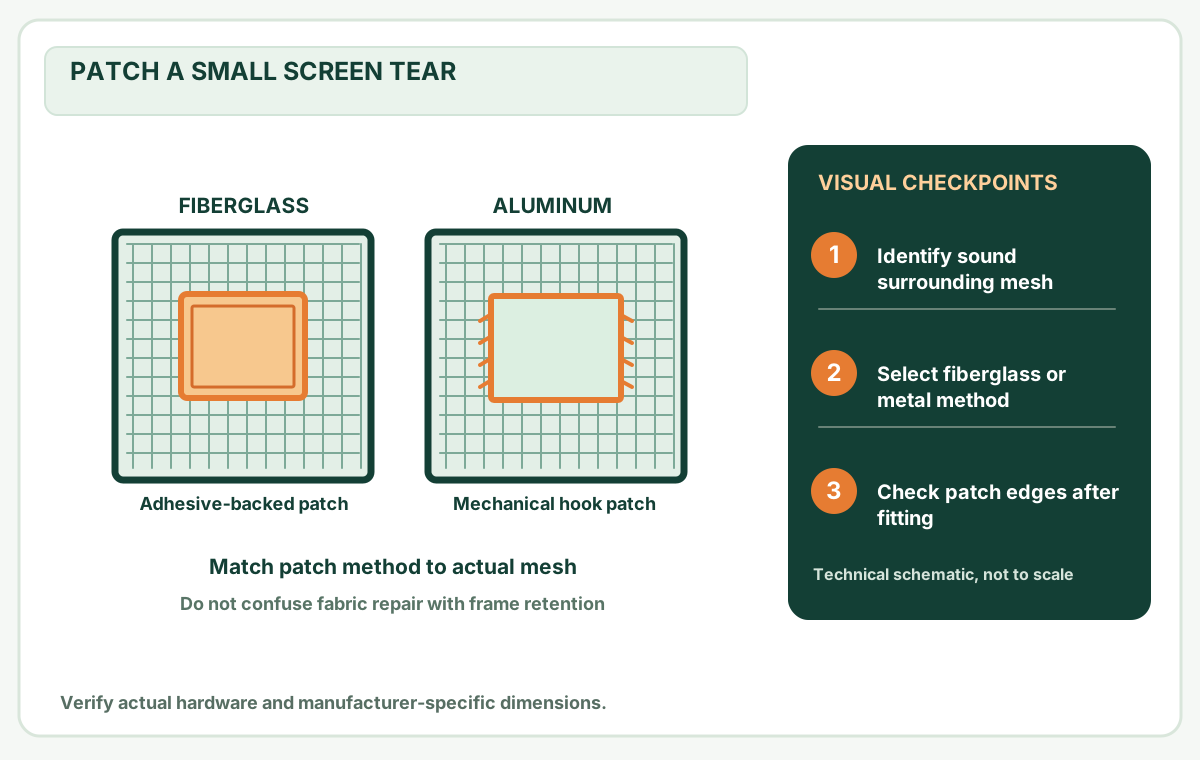
- Check each corner joint. If the frame is significantly bent or split, repair that problem before fitting new mesh.
If the old spline has become brittle, flattened or torn, replace it instead of assuming it can safely be reused.
Cut mesh with working allowance
Lay the mesh across the frame so the weave is reasonably aligned with the rails. Leave spare fabric outside every spline groove. Choose that allowance from the installation instructions for your actual mesh and frame; the comparison below separates the published method from the calculator's editable planning default.
Do not trim the mesh to the finished frame dimensions before installing the spline. You need material to grip and control during installation.
Choose the mesh overhang from the actual installation method
A loose mesh cut is larger than the screen frame so the installer has fabric to hold while rolling spline. This is a temporary cutting dimension, not a replacement frame order size. Two first-party Phifer documents describe different handling margins: its window-screen installation webpage says ½ inch per side, while the Phifer screening and accessories brochure (PDF) illustrates at least 1 inch per side for a DIY installation. These are source-specific procedures, not a universal fit rule. MendNook's calculator pre-fills 1 inch as an editable example, not an independently tested optimum. Follow the instructions relevant to your exact frame, mesh and installation method.
On a narrow screen, scroll this table sideways to see every column.
| Existing rectangular frame | Extra mesh on each side | Loose sheet cut | What the number means |
|---|---|---|---|
| 30 × 24 in | ½ in (Phifer tutorial example) | 31 × 25 in | Fabric to handle and later trim |
| 30 × 24 in | 1 in (MendNook planning default) | 32 × 26 in | Larger optional handling margin |
| 30 × 24 in | 2 in (other DIY workflows) | 34 × 28 in | Extra trimming waste, if maker permits |
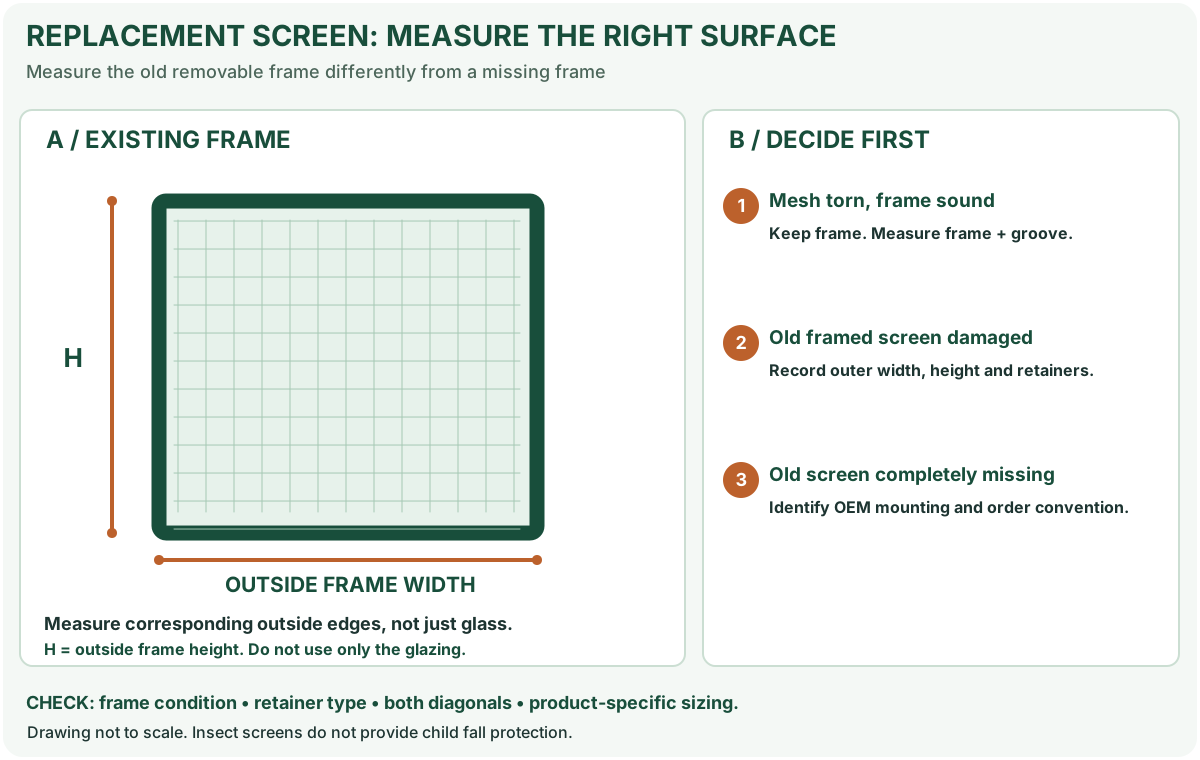
Before buying: inspect the usable width of the mesh roll, its grain/orientation requirements and your product's installation sheet. Even with sufficient total area, the roll may be too narrow for the cut rectangle. Compare cuts in the multi-screen planner and choose the margin deliberately. Never add the mesh overhang to the physical frame dimensions when ordering a frame.
Choose the right roller face and installation sequence
Do not treat fiberglass, aluminum and heavier screening as identical fabric. Lowe's 2026 screen-replacement tutorial describes its grooved roller for seating spline and a rounded roller face for preforming certain aluminum, solar or pet screening into the channel. This is a tool and material distinction, not a guarantee that every manufacturer's mesh can be installed the same way.
On a narrow screen, scroll this table sideways to see every column.
| If you are working with | What changes | What to confirm before starting |
|---|---|---|
| Standard fiberglass mesh | Generally flexible, but tension still must not bow the frame | Mesh orientation, chosen working overhang and compatible spline diameter |
| Aluminum mesh | The screen itself may require careful preforming into the groove before seating the retainer | Manufacturer's approved roller technique; protection against sharp wire and irreversible creasing |
| Pet-resistant or solar screening | Thicker or different fabric can occupy more channel space | Exact frame/profile chart and the mesh product's recommended spline; do not assume old diameter |
Phifer's screen rollers and spline guidance gives a useful material-specific exception: for its ordinary screening products, it describes starting with spline diameter that matches the frame groove; for aluminum, bronze, PetScreen, SunTex, Super Solar and TuffScreen, it calls for a smaller diameter than the groove. That is the manufacturer's product-family guidance, not permission to guess the size on an unknown frame. The Phifer sizing chart is the better check for the exact frame profile and material. A thicker mesh plus the old spline can occupy too much of a narrow channel. If you changed fabric type and the spline pops out repeatedly, first diagnose compatibility using the loose-mesh guide and spline guide.
Make a dry-fit checkpoint before committing to four edges
Lay the new mesh over a supported, square frame and note the required excess beyond each channel. Verify roll width before cutting: a sheet with enough square footage can still be unusable if the roll is too narrow in the required orientation. Keep mounting tabs or springs in the correct frame location if their design requires installation before the mesh, then start only after identifying the approved product method.
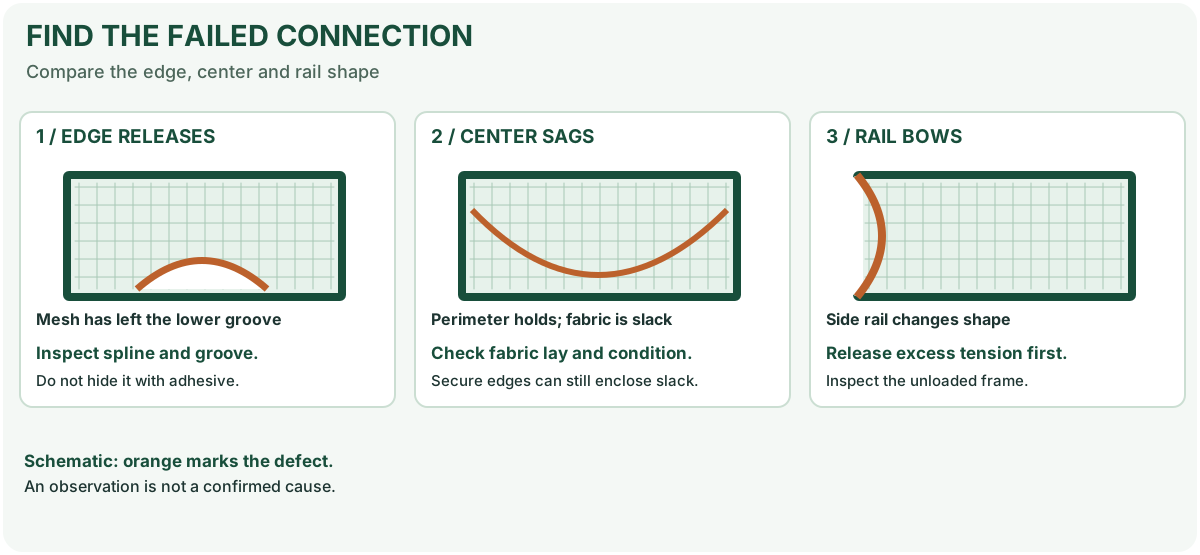
If the rails bow, one corner pulls out or the mesh develops a strong diagonal wrinkle as you proceed, stop and review the frame and placement. Do not trim away the spare fabric until all four spline runs remain seated.
Install the spline
- Begin at a convenient corner or along a straight edge, depending on the frame system.
- Use the spline roller to press the correctly sized spline over the mesh into the groove. Avoid gouging or stretching the fabric.
- Work progressively around the frame. Keep the mesh flat, but not excessively taut; too much pulling force may bow a lightweight frame.
- Watch the weave as you approach each corner. Stop if wrinkles form or if the frame starts twisting.
- Before cutting, check all four runs and corners for raised spline or released fabric, and confirm that the rails remain straight. Then trim the excess carefully along the outside of the spline channel, with hands clear of the cutting path.
A screen does not need to be stretched like a drum. It should look even, stay retained in the groove and leave the frame square.
Check the fit before reinstalling
Look for empty sections of the spline groove, puckering near corners and any edge where mesh has slipped. If an area is loose, work back locally rather than pulling hard on the entire screen. Place the screen back in the opening using its original retention hardware.
For a frame that binds or bows, return to the measuring guide before forcing it into the track.
Troubleshooting: change one variable at a time
On a narrow screen, scroll this table sideways to see every column.
| What fails during the dry fit | Check without cutting the spare mesh | Next decision |
|---|---|---|
| Spline rides above the groove even with light roller pressure | Channel debris, hard/old spline, mesh thickness and exact profile | Stop; match a different compatible spline by the material/frame chart. Do not force the old cord in with a screwdriver. |
| First two sides lie flat but the third pulls into diagonal creases | Fabric weave alignment and whether the first runs were held straight | Lift and re-seat the affected short run while material is still untrimmed; do not stretch away the wrinkle. |
| Long rail bows inward when the final side is seated | Rail support, frame corner integrity and applied tension | Back off; if the frame is bent even without mesh tension, follow frame-geometry diagnosis. |
| Mesh slips out at one corner after tension is released | Corner groove damage, unsupported spline end or wrong retainer fit | Inspect the groove and retainer; do not hide the slip under extra trim or glue. |
| Screen is flat on the workbench but will not fit the window | Hardware orientation, spring/clip seating and original outside frame size | Stop trimming and check screen gap/retainer diagnosis; a mesh replacement does not change frame dimensions. |
Finish-line test: With the panel still on the bench, inspect all four channels and corner joints before cutting excess mesh. Reinstall only using the maker's release and retention method. A taut-looking panel that can detach from the window is not a completed repair.
Switching to a thicker PetScreen: confirm TWO independent product choices
If your original ordinary fiberglass panel tears repeatedly from claw contact, a pet-resistant product may be worth considering. But changing the fabric is two separate compatibility decisions before you ever place the frame on the bench: (1) usable roll width/length and (2) spline and groove. These are not solved by the same measurement.
Phifer lists PetScreen DIY standard widths as 30, 36, 48 and 60 in, with larger 72- and 96-in options in Black only. That is product availability information, not an instruction to install every roll in every frame. In its spline chart the maker provides a named 5/16 x 3/4-in frame example using 0.140-in spline for standard fiberglass versus 0.125-in spline for PetScreen/TuffScreen. Changing the fabric without checking the channel can leave the new mesh poorly retained or force the installer to distort the frame.
On a narrow screen, scroll this table sideways to see every column.
| Real planning question | Wrong shortcut | Better buyer evidence |
|---|---|---|
| Need 40 x 80 in temporary mesh blank | "36 in wide is close enough if the roll is long" | 36-in roll width fails because neither 40 nor 80 in spans it; a 48-in roll with at least 80 in usable length passes this geometry-only check |
| Have enough square footage but stock is 36 in wide | Divide total roll area by total blank area | Check the narrow roll dimension and allowed fabric orientation before computing sheet counts |
| Changing a named Phifer fiberglass mesh to PetScreen | Reuse the old 0.140-in spline automatically | For the named 5/16 x 3/4-in frame only, compare Phifer's 0.125-in PetScreen chart cell; check the real channel and maker guidance |
| Want 72-in gray PetScreen | Order an arbitrary online "gray pet mesh" and assume the same model | Manufacturer lists 72/96 in Black only; ask for a documented alternative and verify actual SKU/color |
Example cutting plan: With the 40 x 80-in blank already including its chosen handling allowance, a hypothetical 48 x 84-in stock piece leaves 8 in across width and 4 in along length after one intact cut. Those remaining pieces do not automatically make another usable screen. Actual roll packaging may have unusable edges, a different grain direction, or no such width/length/color combination at the seller; confirm the exact product. This is a teaching calculation, not a guaranteed shopping list.
Practical stop: If the frame itself is bent, the spline groove is crushed, or the new material would pull a joint apart, stop before trimming. A wider roll or smaller spline alone cannot restore a damaged structural screen frame. Use the frame inspection and spline selection instead.
Multiple screens: choose stock width from actual cut rectangles
A total-square-footage calculation cannot prove a roll is wide enough. Suppose two existing sound frames measure 30 × 24 in and 38 × 30 in. If your chosen instructions permit 1 in of working overhang on every side, the loose cutting rectangles are 32 × 26 in and 40 × 32 in respectively. Those are fabric cut sizes, not replacement-frame order sizes.
On a narrow screen, scroll this table sideways to see every column.
| Stock choice | Screen A: 32 × 26 in | Screen B: 40 × 32 in | Buying decision |
|---|---|---|---|
| 36-in-wide roll, fabric can rotate 90° | 32 in across roll, 26 in along it | Rotate to 32 in across, 40 in along | Both fit by width; at least 66 linear inches, plus cutting loss, are needed if cut consecutively |
| 36-in-wide roll, fabric orientation must stay fixed with 40 in across | Fits | Cannot fit a 40-in cross-roll cut | Choose wider material or an approved different fabric/layout, not a seam invented by the calculator |
| Roll width and orientation not confirmed | Unconfirmed | Unconfirmed | Check packaging and manufacturer instructions before purchasing |
This is a worked geometric example, not a promise about roll stock, seams, weave direction, waste-free nesting or your mesh type. Use the multi-screen planner to record each sheet; verify the supplier's actual usable roll width and orientation separately. Measure spline runs on the frame itself and match retainer diameter from the product chart rather than estimating by mesh area.
Source
Phifer — Installation — supported installation sequence; follow the exact product instructions.
Phifer — PetScreen DIY product widths and color availability — 72/96-in Black-only sizes; confirm exact retail width/length pairing.
Phifer — Screen Rollers and Spline — identifies specific thicker/metal fabrics for which smaller spline is recommended in Phifer's product family.
Lowe's — Updated screen replacement instructions — describes the distinct roller face for several thicker/stiffer fabrics; verify the product's own directions.
After the project: did it work?
After completing only product-approved work, document what you actually observe instead of assuming a replacement part resolved the fault.
- Success looks like
- Mesh is retained on every side with even tension, no accidental cuts near spline and the screen reinstalls without distortion.
- If it still fails
- If mesh releases from a corner or the frame bows, revisit groove/spline fit and avoid pulling harder.
- Keep for next time
- Mesh type; spline; frame dimensions; perimeter inspection
Keep your actual measurements and observed result in your private project notebook. This is a verification checklist, not a product certification.
My project record: progress and take-home checklist
Select a progress stage if helpful. This is a personal record only, not a claim that MendNook verified your repair.
Includes this guide's specific diagnosis, decision, safety, and outcome checks, plus any note entered above. Nothing is sent to MendNook; downloads and copy operations stay under your control.