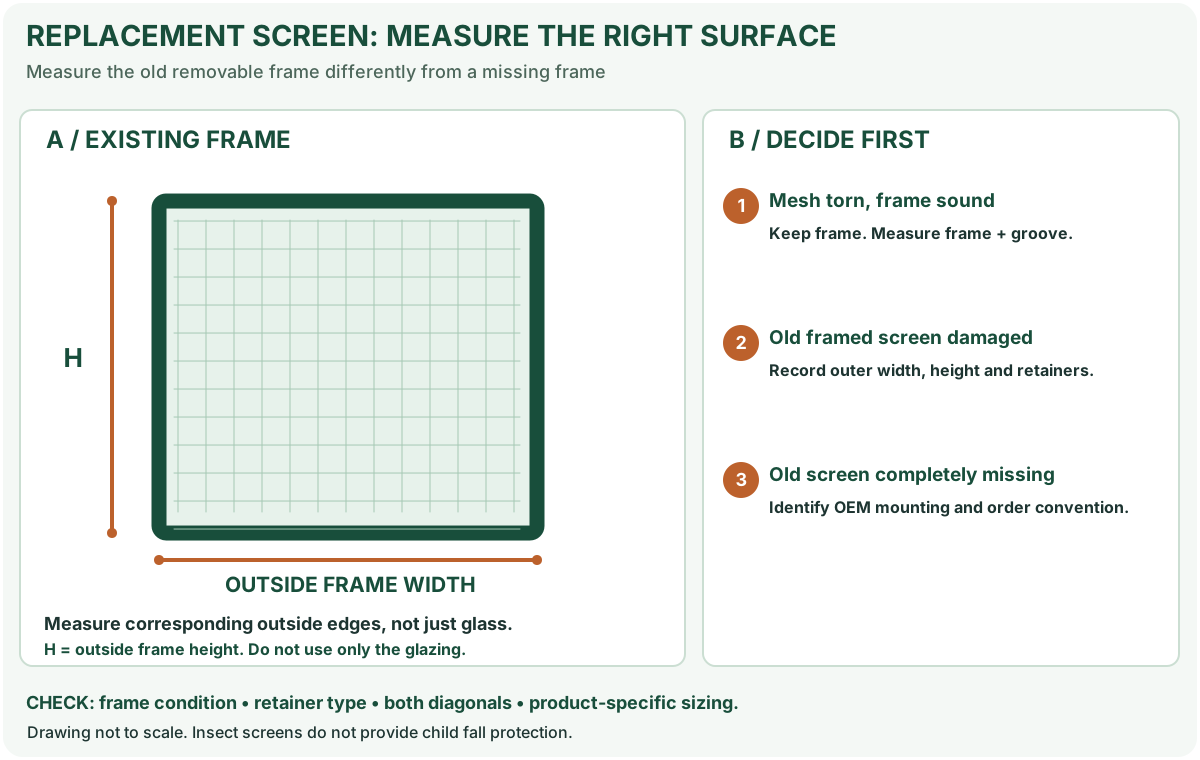
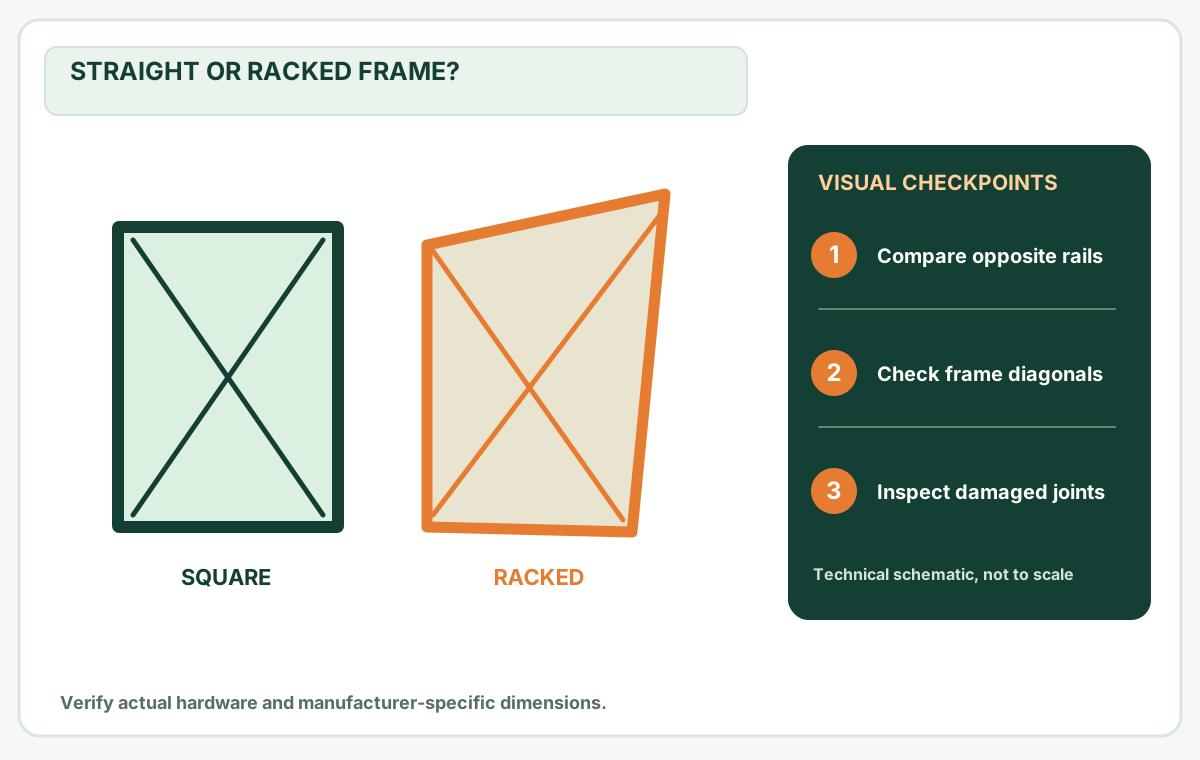
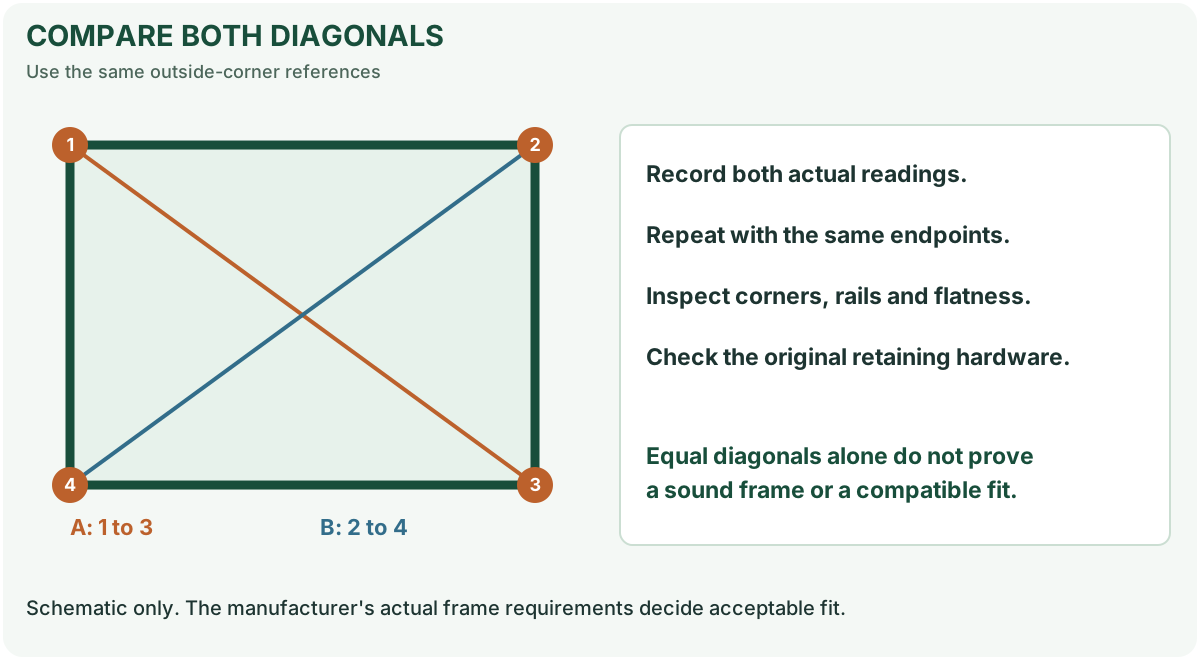
Diagnose whether the gap comes from missing retention hardware, a skewed frame or the wrong frame size before adding filler.
Before you buy or repair
- Record first
- Whether the gap is between mesh/frame or between complete frame/opening
- Make the decision
- Correct frame size, seating clips, corner fit and retention before any temporary sealing
- Stop & verify if
- A damaged window track or large opening would be concealed by tape or filler
Jump to a section
- Diagram checkpoints
- 1. Find the exact location, without removing the screen yet
- 2. Do a four-edge seating and retention check
- 3. Interpret the gap pattern before ordering anything
- 4. Match the actual failure to the repair
- Do not confuse insect-screen fit with child-fall protection
- 5. Record the finding and verify the outcome
- Primary references and limitations
- After the project: did it work?
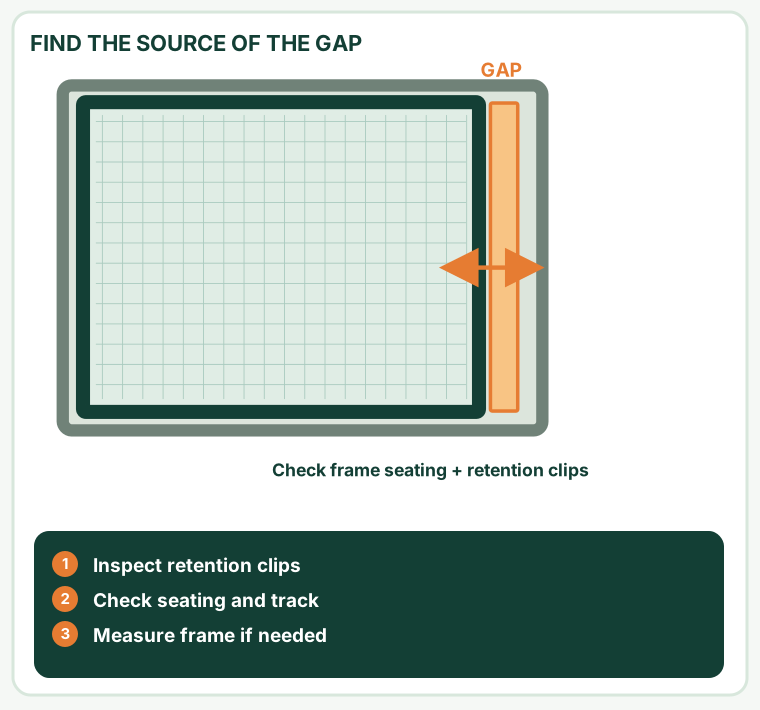
Open desktop diagram ↗ Open mobile diagram ↗
Read the diagram: three checkpoints
- Inspect retention clips
- Check seating and track
- Measure frame if needed
A window screen can look too small even when its outside dimensions are correct. A screen may sit in the wrong channel, have a weak compression spring, be installed in the wrong orientation, or be twisted at one corner. Buying a larger replacement before identifying the actual gap surface can leave you with a second screen that also will not seat.
Quick answer: First decide whether the opening is between mesh and its screen frame or between the complete framed screen and the window track. These require different repairs. The diagnostic checks below are for removable insect screens, not structural glazing or child-safety window guards.
1. Find the exact location, without removing the screen yet
From a safe position indoors, close the window normally and look at the four screen-frame edges with a flashlight. Note the side, corner, and whether the gap is continuous or wedge-shaped. Do not press on the glass, lean out a window, pry at an elevated screen or rely on the mesh to support weight.
On a narrow screen, scroll this table sideways to see every column.
| What is visibly separated? | What it suggests | First relevant guide |
|---|---|---|
| Mesh pulls out of a groove but the outside frame stays seated | Spline retention, torn mesh or damaged groove | Fix loose mesh |
| Whole outside frame stands away from the track | Retainer orientation, missing spring/clip, wrong frame profile | Continue with the seating check below |
| Only one frame corner fails to touch the stop | Bent rail, loosened corner joint or debris | Check frame geometry |
| Frame sits flush but insects still enter | Small mesh tears, damaged mesh-to-frame joint or a separate opening | Inspect repairable mesh |
A screen insect gap is not an air-sealing gap around the actual window sash. Weatherstripping or caulk designed for a moving window assembly does not belong automatically in a removable screen track.
2. Do a four-edge seating and retention check
Record TOP / LEFT / RIGHT / BOTTOM on a simple sketch and note where the screen is meant to engage a lip, rail or mounting clip. Compare the same edge at its two corners; a visible wedge is more informative than only noting a single maximum gap.
- Check the complete perimeter. Is the whole frame seated behind the intended retaining lips? Observe whether one edge is displaced or one corner has a visible twist.
- Identify the retention system. Look for compression springs, pull tabs, turn buttons, plungers or proprietary clips. A pull tab helps remove a screen; it does not by itself prove the panel is retained.
- Look for the original mounting orientation. On some designs, a spring-equipped rail is meant to enter a specific channel first. The safe sequence depends on the actual window series.
- Check for obstruction. Clean visible dust, paint buildup and loose debris according to the window maker's procedure. Do not file metal, bend vinyl lips or force the screen around a damaged stop.
- Reassess only after correct seating. If accessible and safe to handle, compare the result with the manufacturer's reinstallation instructions; otherwise stop and request support.
Manufacturer example, not a universal technique: Milgard's removable-screen instructions (PDF) identify compression spring, frame, mesh and screen tabs as separate components, and describe a model-specific press-up/slide-in sequence. A Pella, Andersen or unbranded screen may use entirely different retainers. Never invert a screen just because it resembles the Milgard drawing. The Milgard companion video gives an additional visual reference for that manufacturer's system.
Match the release hardware before copying any removal technique
Milgard publishes separate instructions for distinct screen and window constructions. Its spring-and-screen-tab sheet describes a snug-fit panel that is pressed upward as its tabs are lifted. The fiberglass-window pull-tab guide instead tells readers to confirm its particular plastic-pin-style pull tabs; the vinyl-window lip/finger-pull guide identifies a raised metal lip. These are examples of different identification paths, not interchangeable methods.
On a narrow screen, scroll this table sideways to see every column.
| Retainer detail you can actually see | Evidence to capture before removing | Do not conclude |
|---|---|---|
| Compression spring and separate lift tab | Close-up of the spring-bearing edge, receiving track and pull tabs | That every screen with a tab can be lifted in the same direction |
| Small pin-like pull tabs on a fiberglass-window screen | Overall window-series label and close-up of the tab shape | That the plastic tab is itself the full retaining mechanism |
| Raised metal lip/finger pull on a vinyl-window screen | Where the lip meets the frame and the window's designated release path | That an unseen compression spring is present |
| Flush hardware, unfamiliar clips or no identifiable retainer | Two angled photos of the frame corners and track, plus brand/series | That prying, bending a lip or enlarging the frame will solve the gap |
Decision at this stage: If the screen is installed but the retainer type cannot be identified from indoors, leave it undisturbed and ask the manufacturer or screen supplier for the exact installation sheet. A photo and series identifier are more useful than a guessed clearance measurement.
3. Interpret the gap pattern before ordering anything
These worked examples show why a number alone does not identify the replacement part.
On a narrow screen, scroll this table sideways to see every column.
| Observation you record | Better diagnostic hypothesis | What would falsify it? |
|---|---|---|
| A roughly 1/8-inch strip at the side; frame moves sideways easily | Spring/retainer is absent, unseated or installed on the wrong edge | All intended retainers are present and fully engaged; frame still mismatches track |
| Gap widens from nearly zero at top to 1/4 inch at bottom | Racked frame, mis-seated corner or bowed guide | Frame outside edges and both diagonals agree on a stable flat surface |
| Screen sits in the track, but mesh edge lifts when touched gently | Spline has pulled away or groove is damaged | Mesh stays securely splined across the entire perimeter |
| Old frame seats normally; new preframed unit leaves a continuous gap | Wrong order convention, hardware profile or replacement series | Supplier confirms outside frame dimensions and exact retention geometry match |
The numerical sizes above are illustrative observations, not acceptable clearances or permitted installation tolerances. Do not buy a universal 1/8-inch foam strip or 1/4-inch taller frame based on these examples.
If the frame is safely removable, lay it on a flat padded surface and measure outside width, outside height and both diagonals; use the replacement screen measurement guide. The frame diagonal calculator helps compare readings, but cannot certify an allowed manufacturer tolerance.
4. Match the actual failure to the repair
- Mesh lifted out of a sound frame: Check groove shape, fabric thickness and correct spline, then re-screen the damaged edge or panel. Phifer's sizing chart shows that spline sizing can vary by frame and mesh combination.
- Missing or ineffective spring/retainer: Identify the exact window series and mounting hardware, then choose a compatible clip or plunger. Start with the retainer hardware guide.
- Bent or broken screen frame: Check corners and geometry on a stable work surface. If the frame is racked, pulling mesh tighter will not square it. Use the bent-frame decision guide.
- Correct frame cannot enter the intended track: Identify any obstruction and the exact manufacturer's reinstallation method before altering or ordering the frame.
- Replacement screen is missing entirely: A glass dimension or visible opening dimension is not an automatic finished screen size. Record the track, spring side, lip depth and order convention; use the measurement guide and ask the supplier for an installed-profile drawing.
Avoid gluing or taping the framed screen permanently to the window. It can conceal failed hardware, damage finishes, and interfere with intentional removal. A taped screen is not an equivalent replacement for working spring clips or locking retainers.
Do not confuse insect-screen fit with child-fall protection
A properly seated insect screen may block bugs, but it is not engineered as a child-fall barrier. The U.S. CPSC's April 2026 window-safety announcement recommends child-safety window guards or window stops for the relevant risk, keeping climbable furniture away from windows, and never relying on a screen to prevent a fall. For windows on the sixth floor and below, it emphasizes guards that adults and older children can open easily in an emergency. Building requirements and the exact egress window system control what is allowed.
On a narrow screen, scroll this table sideways to see every column.
| What the person needs to accomplish | Appropriate equipment/next task | Dangerous assumption |
|---|---|---|
| Keep small flying insects outside | Repair mesh, spline and original frame-retention hardware; verify seating on all four edges | A fitted screen can bear a child's weight |
| Keep the insect-screen panel from dropping from its track | Identify original springs, clips, track and manufacturer-approved service components | Extra adhesive or an oversized screen substitutes for retention |
| Prevent a child falling through an open window | A compliant window guard/stop specified for the window and local egress conditions; ask a qualified installer if unsure | A “heavy-duty” insect screen or a newly tightened spline is a safety guard |
| Block rainwater or exterior drafts at the actual window frame | Diagnose flashing, sash weatherstrip, operable joints and water drainage independently | More screening material or sealed screen tracks will weatherproof the window |
Pass/fail after the insect-screen repair: the panel is seated and retained for its intended insect-screen function, can be removed by the approved sequence and does not interfere with the sash or emergency operation. This does not constitute a fall-safety test. If children can access the window, address window-guard/stop safety independently and never add hardware that prevents emergency opening.
5. Record the finding and verify the outcome
A useful field note contains the window location, manufacturer/model if readable, opening style, gap edge and shape, outside frame dimensions, both diagonals, retainer photos, and whether gentle correct seating changes the gap.
An appropriate completed repair means the screen is seated in the intended channel with the proper retention hardware, mesh and spline remain secure, ordinary window operation is unobstructed, and the screen can be intentionally removed according to its maker's instructions. A screen that may fall unexpectedly or detach during normal window use needs further service.
Safety stop: Window insect screens are not fall barriers for children. The U.S. CPSC explicitly warns never to depend on screens to prevent falls. Follow window-guard and egress instructions for your building; do not modify a window in a way that interferes with emergency escape.
Primary references and limitations
U.S. CPSC — Window Safety Week 2026 — guard/stop and emergency-egress guidance.
Milgard: How to remove/reinstall a screen (PDF) — a specific spring-and-tab retention example, not a rule for all manufacturers.
Milgard: Window-screen removal video — first-party visual orientation example.
The Home Depot: How to repair or replace screens — mesh repairs versus frame replacement and the importance of screen type.
Phifer: Screen/spline sizing — compatibility varies by frame and mesh.
U.S. CPSC: Preventing window falls (PDF) — screens are not a child safety device.
This is a source-based decision guide, not a report of physically testing an identified window or authorizing a modification to an unknown window system.
After the project: did it work?
After completing only product-approved work, document what you actually observe instead of assuming a replacement part resolved the fault.
- Success looks like
- The removable screen seats securely in its intended track and no unsafe opening remains around the frame during normal window movement.
- If it still fails
- If it rocks, falls out or still has unequal edges, identify the mounting mechanism and frame size rather than stuffing the gap.
- Keep for next time
- Gap locations; frame dimensions; retaining hardware; reinstallation result
Keep your actual measurements and observed result in your private project notebook. This is a verification checklist, not a product certification.
My project record: progress and take-home checklist
Select a progress stage if helpful. This is a personal record only, not a claim that MendNook verified your repair.
Includes this guide's specific diagnosis, decision, safety, and outcome checks, plus any note entered above. Nothing is sent to MendNook; downloads and copy operations stay under your control.