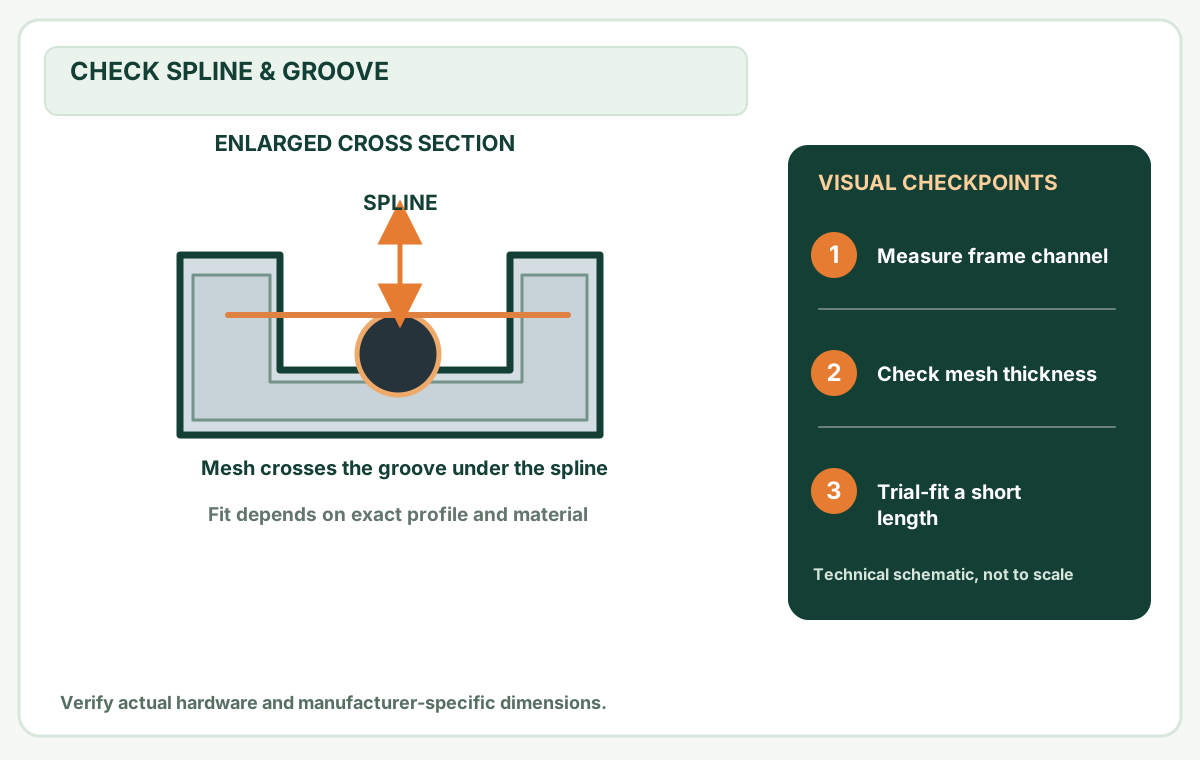
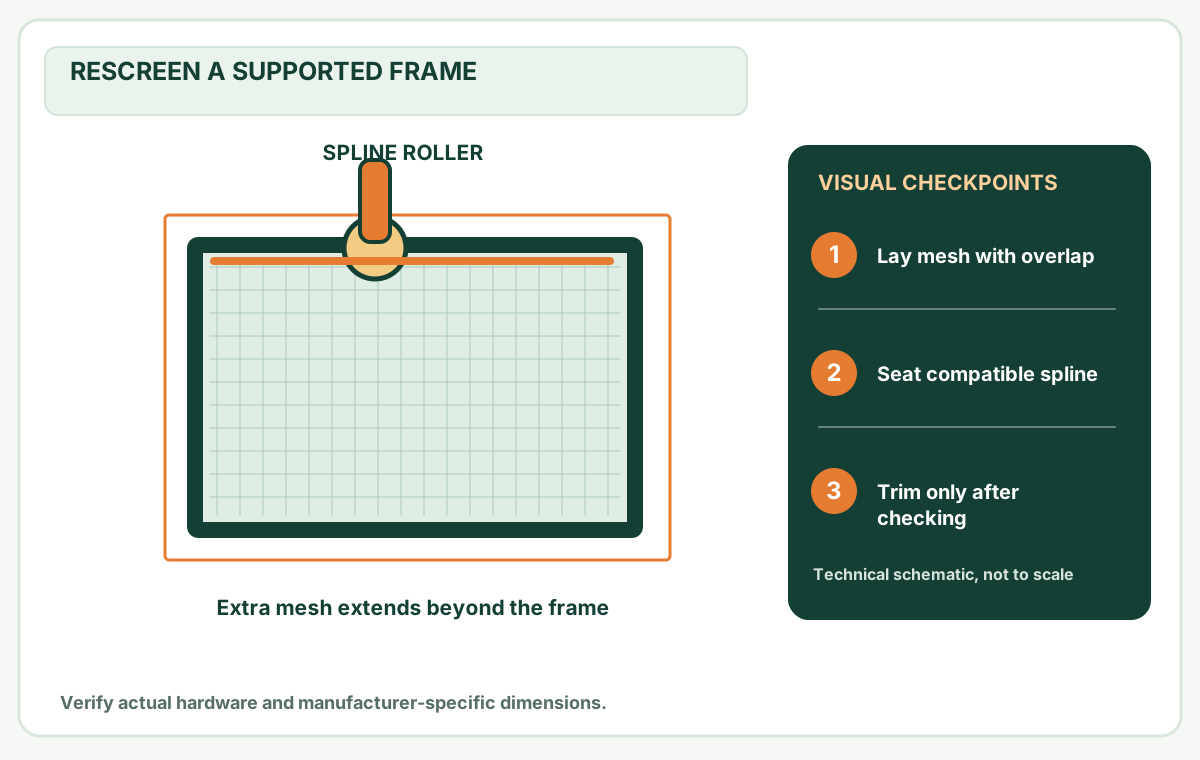
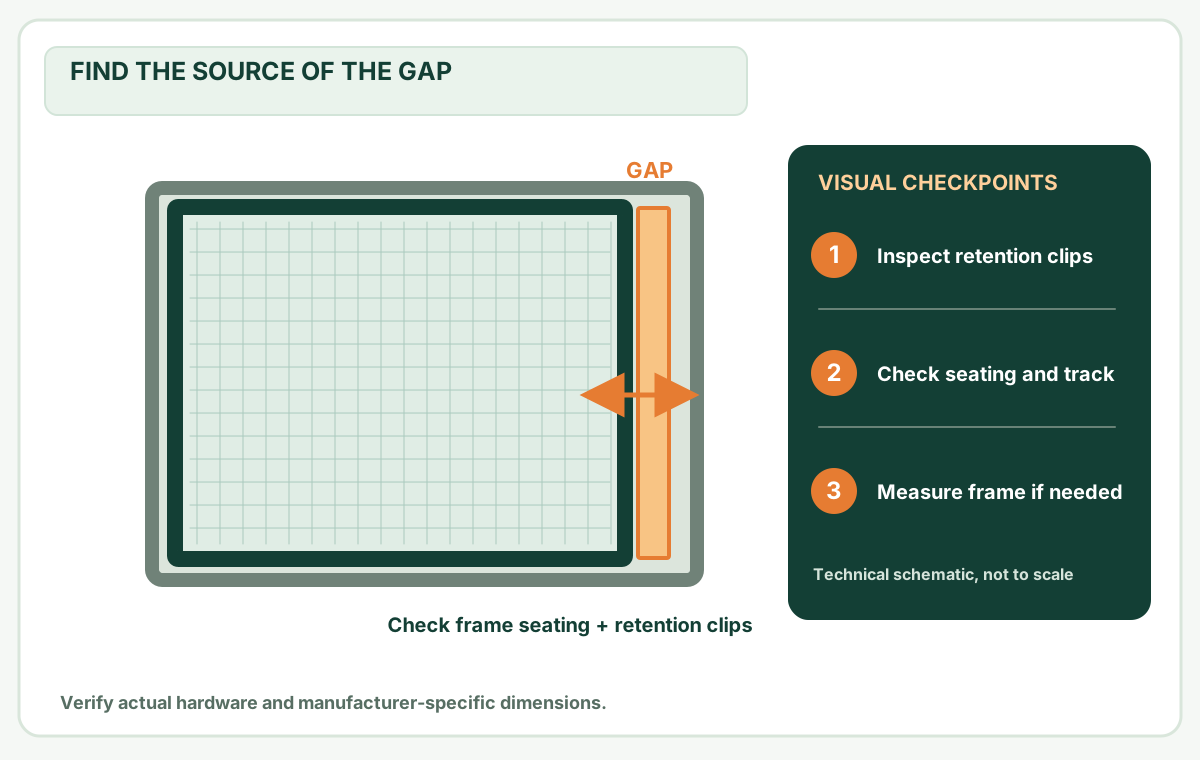
Check the spline channel and spline fit before replacing the mesh: a loose spline can let good mesh sag.
Before you buy or repair
- Record first
- Which edge released, spline condition and whether mesh has torn
- Make the decision
- Reuse sound frame only if groove and corner joints can securely retain fresh material
- Stop & verify if
- The channel is split, a panel is unusually large or the frame cannot lie flat
Jump to a section
- Diagram checkpoints
- Diagnose the first place that moves
- Decide whether the existing mesh can be reused
- Do this three-minute inspection before replacing anything
- Re-seat one repairable section
- Worked diagnosis: the same wrinkle, two different causes
- Three purchase decisions that prevent wasted material
- Verify the repair before putting tools away
- Sources and limitations
- After the project: did it work?
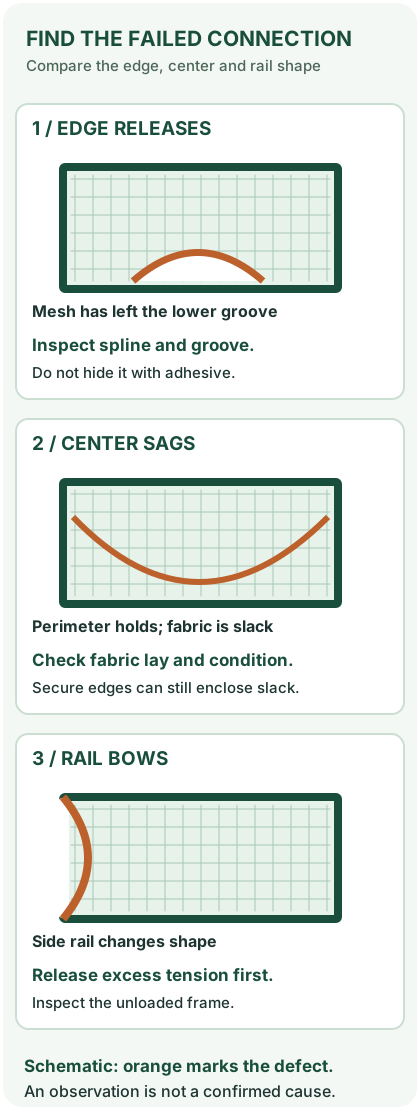
Open desktop diagram ↗ Open mobile diagram ↗
Read the diagram: three checkpoints
- Check spline seating
- Inspect mesh tension
- Examine frame joints
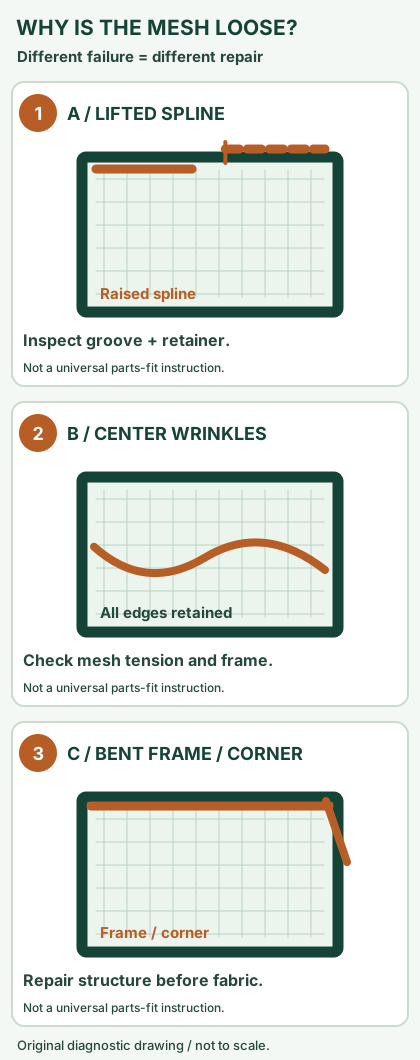
A loose edge does not automatically need tighter mesh or thicker spline. First locate the failure: fabric slipping out of a groove, slack fabric with secure edges, or a frame that changes shape. This guide covers removable, round-spline screens. Identify proprietary or rigid retainers before attempting the same repair.
Diagnose the first place that moves
Remove the screen using its documented release method and support it flat. Inspect without stretching the fabric. Note whether the problem existed before the last rescreening or appeared during it.
On a narrow screen, scroll this table sideways to see every column.
| Observation | Check next | Repair decision |
|---|---|---|
| Mesh lifts beside one rail | Is the spline raised, damaged or sitting in debris? | A local reset may be possible |
| All edges stay captured but the middle sags | Is the fabric stretched, creased or unevenly laid? | Re-lay usable mesh or replace it |
| Rail bends inward as spline is installed | Does the unloaded frame lie straight? | Release tension and inspect the frame |
| Only a corner releases | Is its channel continuous and its joint intact? | Fix the corner defect before rescreening |
| Failure began after changing mesh type | Does the new mesh match the specified retainer? | Recheck the exact material combination |
These are inspection paths, not proof of a single cause. Photograph or sketch the failed edge before changing it so you can compare the result.
Decide whether the existing mesh can be reused
A local reset needs undamaged fabric that still reaches across the groove with enough spare material to hold. Once a sheet has been trimmed close, pulling it back into place may draw the opposite edge out. Do not turn one loose corner into four loose edges.
Reset locally when one section has released, the surrounding fabric is sound, the channel is intact and the specified spline is available. Replace the mesh when edges are frayed, there is no usable handling margin or several sections have stretched. Inspect the frame first when a rail is kinked, the groove is split or corners separate.
A patch over a tear answers a different problem: it does not restore mesh retention along the frame. See the frame inspection guide if the structure is uncertain.
Do this three-minute inspection before replacing anything
Use a stable flat table, a bright light and a photo of the screen as it was installed. If removal is not safe, stop rather than leaning outside a window. You need three different observations, not a single judgement that the mesh is “loose”:
- Is the spline actually elevated? View the entire suspect run from an angle. A raised or missing segment points to a retention problem, not automatically insufficient tension. Check the groove and the corner where it starts.
- Does the fabric have slack even though all four runs are seated? Gently observe wrinkles without pulling on the weave. A secure perimeter with a loose center suggests uneven installation, stretch or an out-of-square frame.
- Does the unsupported frame change shape? Compare straightness with the screen lying flat. A rail bowing as spline is rolled is a different failure from a groove that is already cracked.
On a narrow screen, scroll this table sideways to see every column.
| Evidence you record | What it rules out | Sensible next action |
|---|---|---|
| Spline lifted on one side, mesh otherwise sound | Not simply a cosmetic wrinkle | Check one controlled local reset, then inspect four edges |
| Spline fully seated but a diagonal wrinkle persists | More spline pressure may not help | Check frame squareness and re-lay or replace fabric |
| Groove is crushed or corner separates | It cannot reliably hold a patch or thicker cord | Stop; ask screen manufacturer or repair shop about the frame |
| Screen only became loose after changing fabric type | Old spline may not suit the new material | Consult the exact mesh/frame spline chart, not color or guesswork |
Phifer's current spline chart lists 0.140 in for standard fiberglass and 0.125 in for PetScreen/TuffScreen for its specified 5/16 × 3/4 in frame. These values belong to that chart row, not every groove and not a recommendation to squeeze in a larger retainer. Measure your actual groove and verify the mesh product.
Re-seat one repairable section
Prepare a spline roller, a suitable blunt lifting tool and a stable work surface. Keep the blade put away until the repair passes inspection.
- Support the rails and locate the end of the affected spline run.
- Lift it carefully without gouging the channel or catching mesh that you intend to reuse.
- Remove loose debris and inspect the exposed groove. Stop at a crack or crushed channel.
- Lay the fabric straight across the channel without hauling on the opposite edge.
- Seat compatible spline progressively with the roller, watching the rail and adjacent corners.
- Inspect the repaired run before trimming anything. If it lifts again, stop and investigate fit rather than repeating with greater pressure.
Phifer's installation instructions support working on a flat surface and securing the perimeter before cutting. The local-reset decision above is an editorial troubleshooting sequence, not a manufacturer-approved repair for every frame.
Worked diagnosis: the same wrinkle, two different causes
Illustrative case A: the lower edge is loose and its spline is visibly raised, but the supported frame stays straight. Inspect seating and the remaining fabric margin; a controlled reset is worth considering.
Illustrative case B: the lower edge remains captured, while the side rails bow inward after tightening. Releasing excessive tension and checking the bare frame comes before further rolling. A larger cord would not diagnose this geometry problem.
Record what changed after one intervention. Changing the mesh, spline and frame together makes it harder to tell which component was responsible. These cases are reasoning examples, not reports of repairs performed by MendNook.
Three purchase decisions that prevent wasted material
Only one edge has lifted, with sound extra mesh: A careful local reset can be worth attempting. Confirm the groove is continuous and the old spline isn't crushed. If an installed patch near the tear is holding but the perimeter keeps slipping, patch adhesive is not a fix for channel retention.
One or more whole runs have lost tension: Inspect all four corner joints and compare diagonal lengths. If the existing sheet was cut too close, it may be impossible to pull it back into the groove without releasing another edge. Buy replacement mesh only after checking the frame is reusable; see rescreen fiberglass mesh for the cutting and spline sequence.
You are changing material thickness: Ask for the screen frame profile and the exact maker's recommended retainer combination. Phifer's DIY FAQ specifically differentiates common fiberglass from thicker specialty screen materials. A new roll with a different weave should not be treated as a like-for-like substitution.
Keep a simple before/after record: which edge loosened, whether its spline was lifted, exact mesh material, groove/retainer condition, rail straightness and result after normal reinstallation. This turns an ambiguous “sags again” complaint into evidence a screen shop can use.
Verify the repair before putting tools away
Check the full perimeter for released mesh and raised spline, then inspect the corners and rail shape. Reinstall with the original retention hardware: the screen should seat using its documented method, without being forced to compensate for distortion. Recheck the repaired edge after normal handling.
If the same edge releases again, document the frame profile, groove condition, mesh product and spline used. Consult the supplier or choose the correct spline before buying another diameter. There is no universal hand-pressure test that certifies every screen.
Sources and limitations
- Phifer — Installation: general spline-and-groove installation sequence.
- Phifer — Spline sizing: material and frame combinations must be checked together.
- Phifer — DIY screening FAQ: practical material-dependent retainer selection; follow the exact product chart.
Work from a safe indoor position; do not lean out to remove a high screen. Mesh retention is not fall protection. This research-based guide does not establish compatibility for an unidentified frame.
After the project: did it work?
After completing only product-approved work, document what you actually observe instead of assuming a replacement part resolved the fault.
- Success looks like
- Mesh is evenly supported and the spline remains seated without bending the rails or pulling a corner apart.
- If it still fails
- If the mesh goes slack or the frame warps, inspect spline diameter, mesh type and support before further tightening.
- Keep for next time
- Screen opening; mesh and spline identification; areas of slack; recheck date
Keep your actual measurements and observed result in your private project notebook. This is a verification checklist, not a product certification.
My project record: progress and take-home checklist
Select a progress stage if helpful. This is a personal record only, not a claim that MendNook verified your repair.
Includes this guide's specific diagnosis, decision, safety, and outcome checks, plus any note entered above. Nothing is sent to MendNook; downloads and copy operations stay under your control.