First decide whether you are replacing mesh only or the complete framed screen. Those require different measurements and must not be treated as interchangeable.
Before you buy or repair
- Record first
- Whether the part to replace is an insert frame, opening or only mesh
- Make the decision
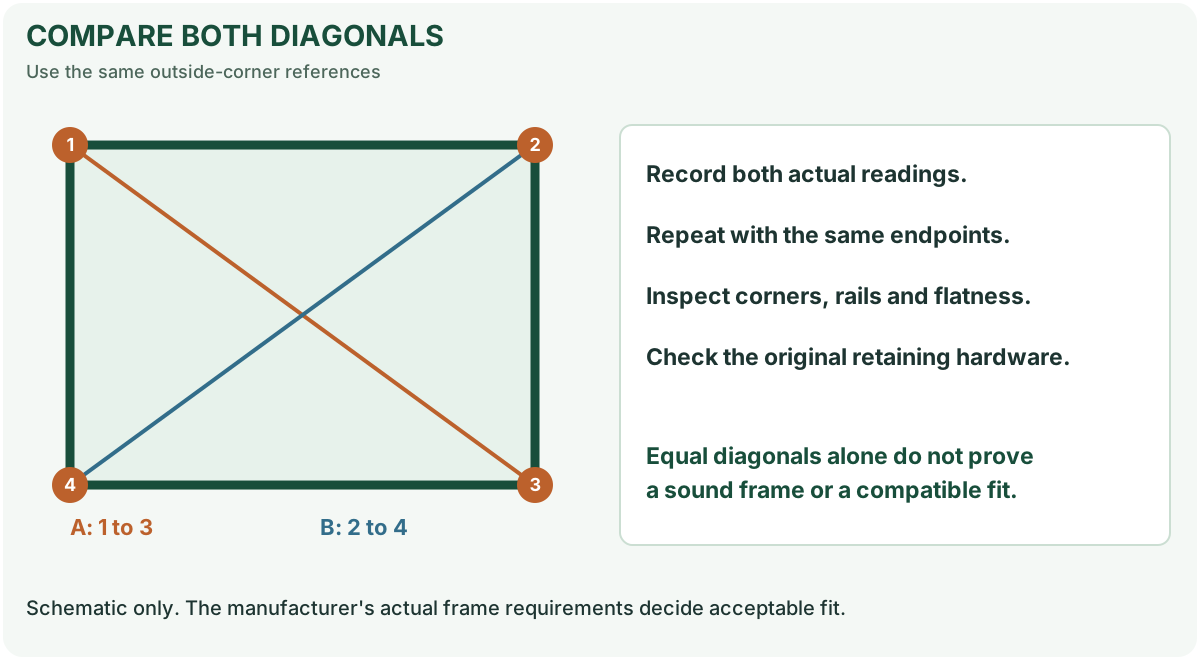
- Outer frame measurements plus clip/track features and both diagonals
- Stop & verify if
- The screen is warped, an opening lacks a secure retainer or the frame profile is unidentifiable
Check your screen measurements before buying
Original browser-only checker: compare your readings, not a finished replacement-screen sizing service. It cannot specify spring positions, frame thickness, or manufacturer deductions.
Enter your readings to see variations and the next check.
This diagnostic does not declare a frame in tolerance: supplier specifications decide fit. For reference, Metro Screenworks documents different mounting-system measurements. See the printable measurement worksheet.
Jump to a section
- Diagram checkpoints
- First identify the part you are measuring
- A decision tree for the three replacement cases
- What Metro's measurement examples do — and do not — establish
- No old screen: do not copy one universal clearance formula
- Two Metro Screenworks instructions differ: confirm the measurement reference before ordering
- RiteScreen 2026: replacement from an intact frame is not the same as an empty opening
- How to double-check inconsistent measurements
- Tools you need
- Measuring an existing rectangular frame
- Check whether the frame is square
- Why measuring the glass is a mistake
- Plan mesh, not finished frame dimensions
- Quick measurement checklist
- Measuring several removable screens in one project
- Convert fractional screen-frame readings without changing order dimensions
- Final check: a screen is not a fall barrier
- References and further reading
- After the project: did it work?
Open desktop diagram ↗ Open mobile diagram ↗
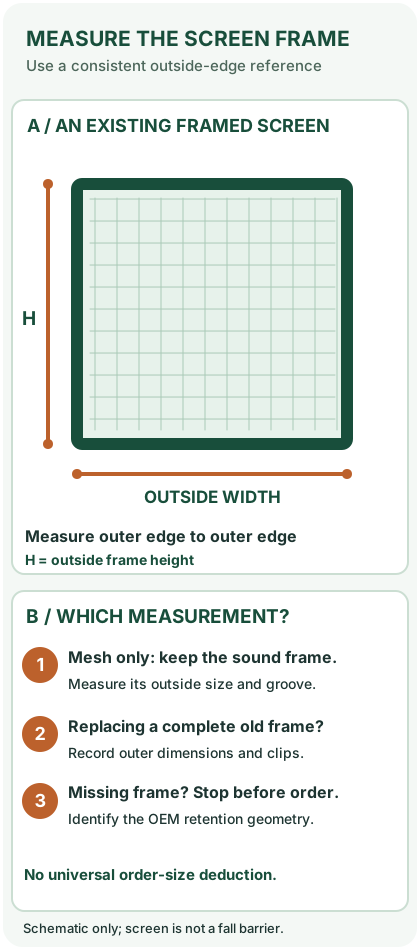
Read the diagram: three checkpoints
- Outside width
- Outside height
- Record mounting clips
A screen that is a fraction of an inch too wide may not seat in the window. One that is too short may leave a gap at the edge. The first question is what exactly are you replacing: just the mesh in a usable frame, the whole framed screen, or a screen when the old frame is missing?
First identify the part you are measuring
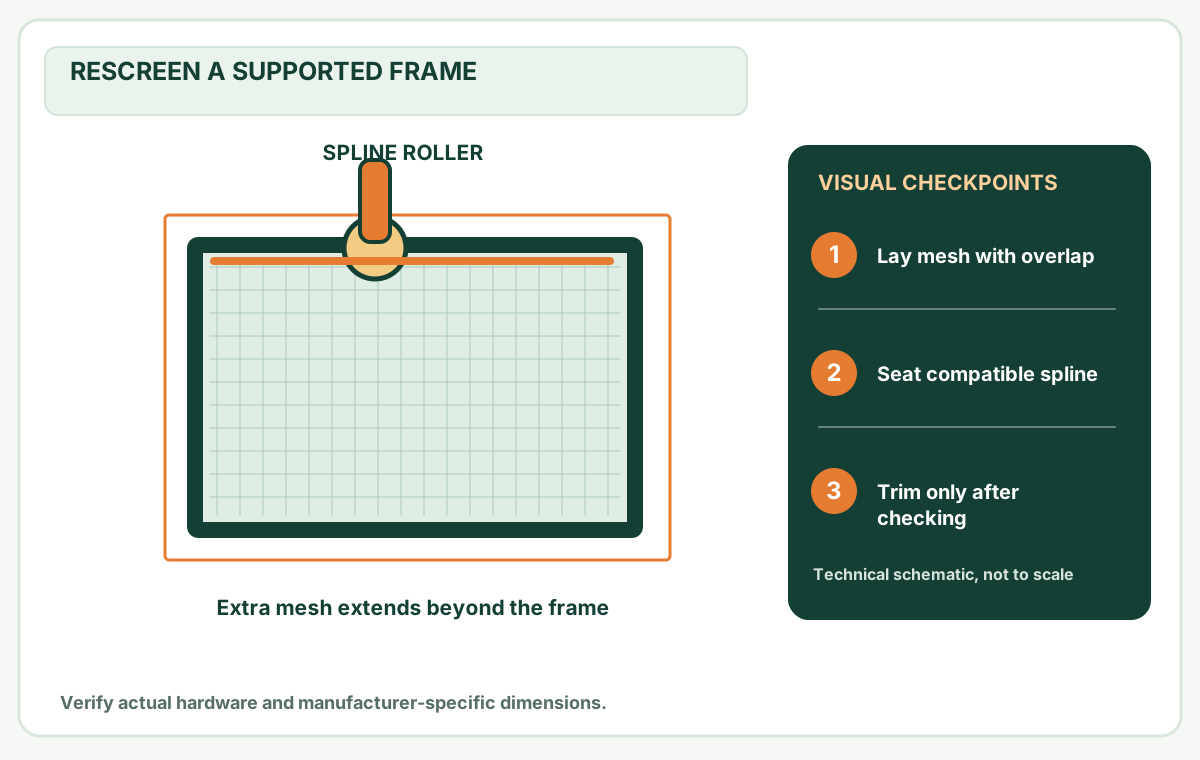
- Replacing mesh only: Measure the existing screen frame's outside dimensions for planning material coverage. You will need extra mesh beyond those dimensions so you can roll the spline into the groove and trim at the end.
- Replacing the full screen and you still have the old frame: The old frame's outside width and height are often the most useful starting measurements, provided it fits correctly and has not been bent.
- No old screen available: Measure the appropriate screen track or opening and identify the window manufacturer's specified clearance and mounting system. Do not assume the opening dimension is identical to a finished replacement screen.
A decision tree for the three replacement cases
On a narrow screen, scroll this table sideways to see every column.
| Your situation | Measure first | Do not assume |
|---|---|---|
| Mesh is torn, frame still fits | Outside dimensions of the screen frame for cutting-material planning | The mesh cut size is the finished frame size |
| Entire old screen exists and fits | Outer width and height in two places, diagonal readings, spring/tab location | Two nominally equal frames have identical retainers |
| Screen is missing | Window model, track detail, mounting hardware and the supplier's measurement convention | A visible opening equals the replacement frame's order size |
Worked example: when the two widths disagree
You measure the top of an old screen at 30 1/8 in and the bottom at 29 7/8 in. The difference is 1/4 in. Do not average to 30 in and order immediately: the rails might be bowed, the frame might be racked, or your tape might not be square. Recheck on a level surface; measure both diagonals and inspect corner joints. If the old screen never fit well, use the opening's manufacturer-specific measurement procedure instead of copying its dimensions.
What to write on the purchase record
Record outer dimensions, measurement points, frame depth/profile, side with spring clips, pull tabs, corner style, opening orientation and whether the frame currently fits. Photograph hardware close-up next to a ruler. This removes several ambiguities that width × height alone cannot resolve.
Not sure whether the old screen is usable, or what holds it in the opening? Use the screen measurement decision assistant to choose the correct documentation path before recording a possible order size. It cannot manufacture a final size without the supplier’s requirements.
What Metro's measurement examples do — and do not — establish
Metro Screenworks' measuring guide includes methods for screens with retaining lips, sliders, screw-mounted solar screens and brick clips. The needed dimension can start at different track edges. It also advises measuring an existing screen's outside frame dimensions and thickness when a fitting screen is available.
A supplier's example clearance must not become a default setting for every screen. Before choosing an order size, label your worksheet “measured outside frame” or “measured opening/track”. These are different quantities even if both are in inches. If the old screen is missing, photograph the retaining hardware next to a ruler and use the hardware decision assistant rather than guessing from the glass.
No old screen: do not copy one universal clearance formula
Measuring the opening is a different job from measuring an existing frame. Metro Screenworks publishes different procedures for conventional screens, slider tracks, screw-mounted solar screens and brick clips. That is why “subtract 1/8 inch from both sides” must not be presented as a universal frame-order formula. Even the placement of springs and the shape of the retaining channel affect fit. See its measuring instructions and support note on tolerance.
On a narrow screen, scroll this table sideways to see every column.
| What you can identify | First record | Do not order until |
|---|---|---|
| A same-model neighboring screen exists and fits | Its outer frame dimensions, frame thickness and retaining hardware | You confirm the window is truly the same model and size |
| Slider with asymmetric deep and shallow tracks | Track shape, orientation, deep side and spring positions | Supplier confirms its slider-specific measuring method |
| Screw-mounted solar screen | Outer fastening location and clearance for screws | Supplier confirms where to measure, screws and reduction conventions |
| Brick clips, plungers or tension springs | Clip type, position, mounting lip and accessible dimensions | Supplier's hardware drawing matches your opening |
| Manufacturer/model unknown | Clear photos of all four track sides beside a ruler | A manufacturer or qualified supplier confirms how to derive an order size |
Example of why the detail matters: a 36-inch visible opening might be compatible with more than one screen-mounting design. Without the correct retaining mechanism, a calculator cannot derive a finished frame size from that 36-inch reading. Measure the part you actually have; do not translate glass width into frame width. The screen maker's documented convention overrides general guidance.
Two Metro Screenworks instructions differ: confirm the measurement reference before ordering
There is an important document conflict within the same screen supplier's published material. It is a reason to confirm the correct window type and starting reference, not to pick whichever one makes a screen easier to order.
On a narrow screen, scroll this table sideways to see every column.
| Supplier document and date/context | Published example for a screen when the old one is missing | Why the buyer must check |
|---|---|---|
| Metro Screenworks' current window-screen measurement page | For its described conventional retaining-lip method, measure vertically from behind the lip to the upper channel and add 1/8 in; its horizontal-channel example says subtract 1/8 in | The reference edges and presence of a retaining lip are part of the instruction. Slider, screw-mounted solar and brick-clip sections have separate directions |
| Metro Screenworks' July 26, 2018 measuring blog | Describes finding the lip and subtracting 1/8 in vertically, then subtracting 1/8 in horizontally | The older blog's vertical sign differs from the current page. Do not silently combine the two recipes or declare either one applicable to another product |
| Metro Screenworks' tension-spring measurement handout | Refers to the deepest channel and spring position and says the installer may deduct about 1/8 in for easier fitting | A conditional note tied to a particular spring installation is not a universal buyer-side deduction or final finished-frame specification |
Worked conflict, deliberately not an order recommendation: imagine a homeowner writes down a 30-in vertical measurement but fails to label its start and end surfaces. Applying “add 1/8” gives 30 1/8 in, whereas “subtract 1/8” gives 29 7/8 in. That is a 1/4-in difference in proposed order size produced by choosing a document without knowing its measurement reference. Neither number can be certified from “30 in” alone.
Better next action: photograph the lower retaining lip, the upper/deepest channel and any tension spring, with a ruler identifying the start/end points. Send the screen vendor those photos, the window make/series, the actual measurement and the exact source document or SKU. Ask which measurement convention and manufacturing adjustment they will use. Mark finished frame order size: pending supplier confirmation until the question is answered. Do not deduct at home and accept an automatic factory deduction without checking.
RiteScreen 2026: replacement from an intact frame is not the same as an empty opening
A second supplier gives a useful independent cross-check. RiteScreen's March 7, 2026 guide to old window screens separates an existing, properly fitted screen from an opening without any old frame:
On a narrow screen, scroll this table sideways to see every column.
| Actual situation | What RiteScreen tells its buyer to measure | Should you deduct 1/8 in yourself? |
|---|---|---|
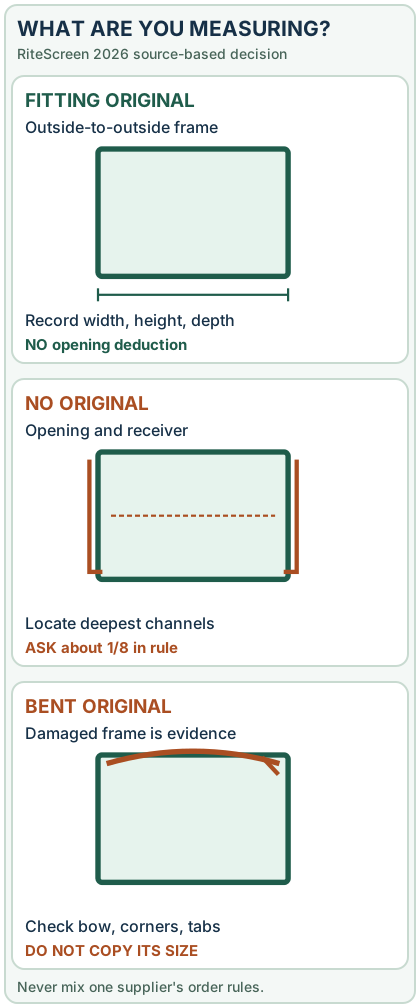
| Existing screen fits correctly and is not bent | Outside edge to outside edge of the original framed screen: width and height to 1/16 in, plus frame depth | No. RiteScreen says its cited opening adjustment is not necessary when measuring an existing screen frame |
| No usable screen; replacement measured from a screen channel/opening | Intended inside opening/channel reference, including deepest track edges and frame depth | RiteScreen's particular replacement-from-opening method calls for 1/8 in off width and height. Confirm that the exact supplier/receiver uses this convention and whether it will apply a factory allowance |
| Old screen is crooked, bowed or missing spring hardware | Record original frame only as evidence, not a trusted final size. Check diagonals, flatness, and attachment hardware | No automatic deduction: first identify a sound window-specific reference; a frame that never fit is not a suitable order-size template |
Why the two-source distinction matters: RiteScreen's March 2026 instructions and Metro Screenworks' current retaining-lip example are different manufacturer/supplier measurement paths. Do not take RiteScreen's 1/8-in opening deduction, apply it to a good existing screen, then let another vendor deduct again. That would silently shorten the ordered panel. Use the same supplier's specified reference surfaces and final order rules for the exact screen family.
Same manufacturer, two 2026 articles with different starting advice
There is an important source conflict in emphasis within RiteScreen's own published guidance, not simply a disagreement between retailers:
On a narrow screen, scroll this table sideways to see every column.
| RiteScreen publication | Exact situation emphasized | What the text recommends | Limit that changes your action |
|---|---|---|---|
| February 27, 2026: How to Measure a Window for Screens | A replacement where an older screen may be wrong-sized or warped | Its key takeaways say to measure the window opening, not assume the old screen is accurate; the detailed procedure uses top/middle/bottom width and left/center/right height, taking the smallest | Cannot assume a worn or badly fitting original was ever the correct order template |
| March 7, 2026: Measuring Old Window Screens | An existing original that still fits correctly | Measure its outside frame width, height and thickness, to the nearest 1/16 inch; its 1/8-inch opening adjustment is not necessary when measuring an existing screen | Only applies if you have established that this is the correctly fitting frame, not a distorted example |
| RiteScreen: Window Screens Guide | A screen being measured in channels versus an existing whole frame | Has separate instructions for track/channel dimensions and outside-to-outside existing frame measurements | Even within one brand, the reference faces differ between routes |
Editorial resolution, not a universal formula: The February article is sensible for an unknown, warped or poorly fitting old frame. The March article is sensible for a verified, original, straight screen that already seats and retains correctly. The published top-level advice appears contradictory if you ignore that condition; do not pretend the wording is identical. The practical decision is first to establish old-screen condition and system type, then record both original and receiving opening where safely possible, and ask the supplier which procedure its actual SKU uses. If the two measurements disagree, stop before entering an order size.
Do not silently combine steps: Taking RiteScreen's opening-based minus-1/8-inch example and applying it to an accurately measured existing frame is not justified by the March guide. Conversely, copying an intact-looking frame that visibly rubs, rocks, or misses its retaining clips is not justified by the February guide. Neither document verifies your home's frame depth, spring travel, clip offset or finished panel tolerance.
A special old-screen example that prevents a costly mismatch
Suppose a properly seated old screen measures 29 15/16 in outside-frame width and 35 7/8 in outside-frame height. Those are the recorded physical readings. Blindly subtracting 1/8 in would turn the proposed order into 29 13/16 × 35 3/4 in without evidence that the seller wants that change. In the existing-screen scenario RiteScreen says not to apply its opening-based deduction. Do not order either pair until actual frame profile, retainers and vendor's form convention are identified. The arithmetic is a hypothetical buying trap, not an approved replacement specification.
One important additional detail from RiteScreen's measurement overview: pull tabs are removal grips fitted to the spline pocket, while pull rails are grasping frame surfaces. A new frame with the correct outer dimensions but missing the original hardware may still be difficult to remove or retain. Photograph the hardware and exact frame cross section alongside the dimensions.
How to double-check inconsistent measurements
For an existing rectangular frame, compare top versus bottom outside widths and left versus right outside heights. Record both diagonals. Do not average mismatched readings into an order size. An out-of-square corner, bowed rail or tape angle could explain the difference. The on-page measurement checker above reports the differences without inventing a universal permitted tolerance. If a screen repeatedly binds, has bent corners or never fit properly, get the supplier's size-confirmation method first.
Tools you need
Have a metal tape measure, a pencil, paper or phone notes, and a flat stable surface. If a screen is above ground level or difficult to remove, follow your window maker's instructions rather than leaning through an opening.
Measuring an existing rectangular frame
- Remove the screen according to the window manufacturer's directions. Identify any spring clips, plungers, lift tabs or other retaining hardware first.
- Lay the frame flat without pushing it out of shape.
- Measure outside edge to outside edge, across the width, at both the top and bottom. Record both values.
- Measure the outside height on the left and right sides. Record both values.
- If the values disagree noticeably, inspect the frame for a bent rail or an out-of-square corner. Do not take an average and order a replacement without understanding the difference.
- Record any hardware positions, corner types and the side on which the screen's spline channel faces. Dimensions alone may not specify a complete replacement frame.
Example: A usable rectangular frame measures 30 inches wide and 24 inches tall from outside edge to outside edge. For a mesh-only replacement, an initial loose cut of roughly 32 by 26 inches gives one extra inch on each side to work with. Those are not dimensions for ordering a new frame.
Check whether the frame is square
Measure each diagonal from one outer corner to the opposite outer corner. In an ideal rectangle, the two diagonal lengths match. A small reading difference can come from how the tape sits, but a clear mismatch can signal a racked frame or separated corner.
For an illustrative 30-by-24-inch rectangle, the theoretical diagonal is about 38.42 inches, using the Pythagorean formula. A real frame may vary due to corner shapes. If the screen binds or gaps, check the track and manufacturer fit requirements rather than forcing it into place.
Why measuring the glass is a mistake
The screen usually fits a separate track or mounting space; it does not occupy the same space as the visible glass. The correct measurement depends on the specific window design, and clips or spring mechanisms may add further constraints. For an unfamiliar window, locate the maker and model number when possible.
Plan mesh, not finished frame dimensions
Use our screen mesh and spline calculator to estimate cutting allowance and spline length from your existing rectangular frame. A calculator can estimate mesh area; it cannot determine custom frame clearance from an opening.
Quick measurement checklist
- [ ] Identify mesh-only repair versus complete screen replacement.
- [ ] Measure outer width at two points and outer height at two points.
- [ ] Check corners, frame straightness and diagonal lengths.
- [ ] Record clips, tabs and other hardware before purchase.
- [ ] Verify sizing conventions with the frame or window manufacturer.
Measuring several removable screens in one project
Never assume two windows labeled the same nominal size have identical removable screen frames. Give each screen a location label, record its outside frame width and height, and keep the original frames with their openings. For example, 30 × 24 in and 36 × 48 in frames (with an extra inch of mesh on every side) become two separate 32 × 26 and 38 × 50 in cut rectangles. A roll with adequate total area may still be too narrow for the 38-in cut. Our multi-screen planner tracks individual cut sizes and combined shopping lengths; it intentionally does not promise any particular roll fits.
Convert fractional screen-frame readings without changing order dimensions
Screen-frame width and height are often read from a tape in mixed inches (for example 30 3/8 in). Use the tape fraction converter to enter the identical reading as 30.375 decimal inches in a calculator. Keep the original tape value in your notes: converting it does not add mesh-cut allowance or establish the required finished replacement-frame size. Those are separate decisions based on what you are replacing.
Final check: a screen is not a fall barrier
Before removing or reinstalling a removable insect screen, make sure the work can be done safely from inside. Do not reach or lean out from an upper-floor opening, and do not leave a screen that may drop into a public area unsecured. The U.S. CPSC's childproofing guidance explicitly notes that insect screens are not effective child-fall protection. Screens support insect exclusion, not a person's weight.
A useful handover record has six fields: measured surface (old frame or opening), top/middle/bottom widths, left/center/right heights, both diagonals, retainer profile/location, and the manufacturer's order convention. If the original screen is absent, leave the replacement frame order size unconfirmed until the supplier identifies the mounting geometry. That is a better outcome than a confident guess.
References and further reading
- The Home Depot — How to Repair or Replace Screens
- Phifer — Screening and Spline Sizing
- RiteScreen — March 7, 2026 old-screen measurements — no 1/8-in opening deduction on a fitting original frame; explicit frame-depth record.
- RiteScreen — screen hardware and frame measurement guide — separates pull tabs, pull rails and channel measurement surfaces.
- Metro Screenworks — Measure for Window Screens (including hardware variants)
- Metro Screenworks — July 26, 2018 historical measuring article — its vertical deduction differs from the current page.
- Metro Screenworks — tension-spring fitting handout — conditional spring and channel geometry, not a general ordering rule.
After the project: did it work?
After completing only product-approved work, document what you actually observe instead of assuming a replacement part resolved the fault.
- Success looks like
- You can distinguish existing outside-frame dimensions from an opening measurement and have identified the seller's required order convention.
- If it still fails
- If the old screen is bent or missing and the supplier's order size isn't defined, do not guess a deduction.
- Keep for next time
- Outside-frame or opening measurement type; hardware photos; confirmed supplier specification
Keep your actual measurements and observed result in your private project notebook. This is a verification checklist, not a product certification.
My project record: progress and take-home checklist
Select a progress stage if helpful. This is a personal record only, not a claim that MendNook verified your repair.
Includes this guide's specific diagnosis, decision, safety, and outcome checks, plus any note entered above. Nothing is sent to MendNook; downloads and copy operations stay under your control.