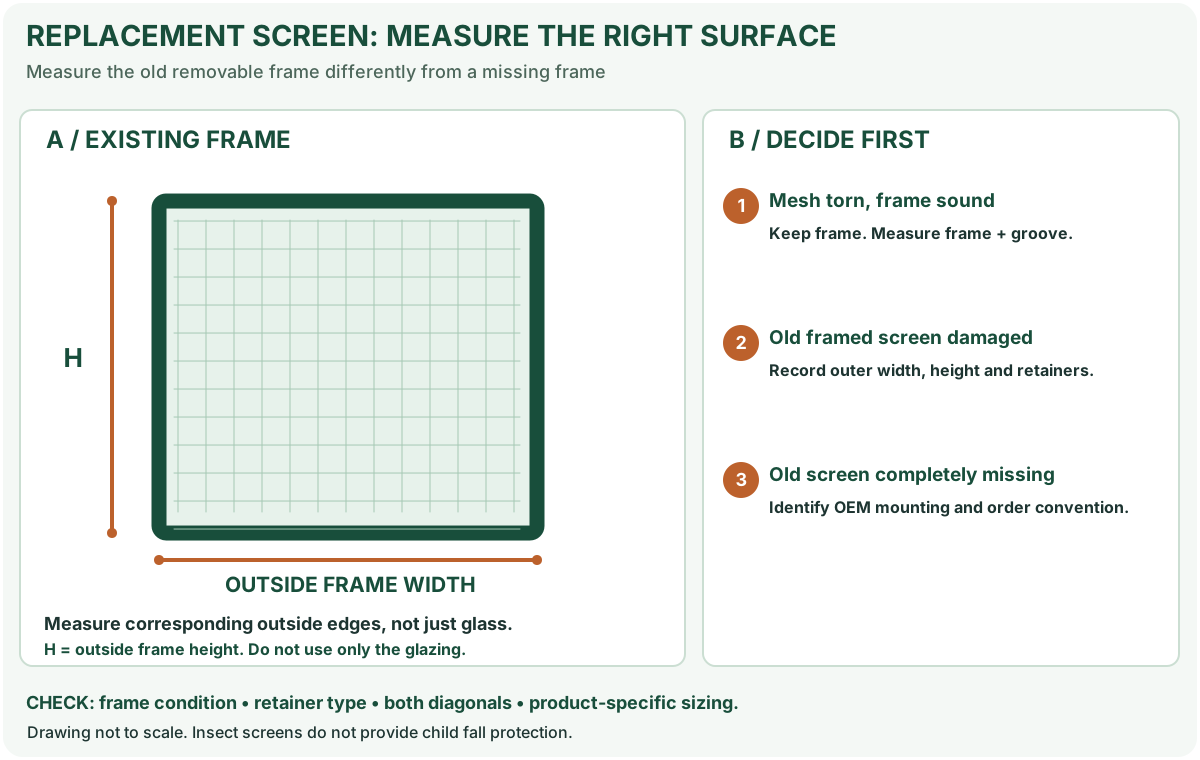
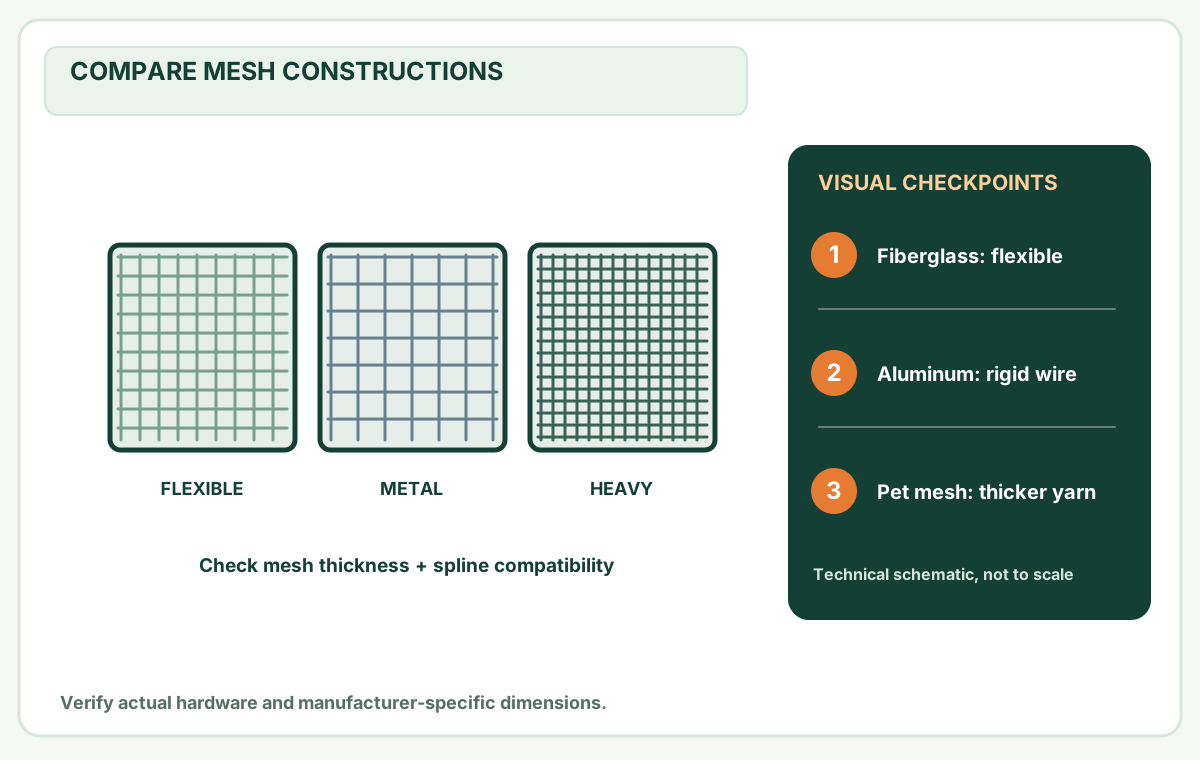
Clean with gentle methods, fully dry the frame and store it upright or flat without bending the corners.
Before you buy or repair
- Record first
- Condition of joints, mesh, clips and frame before cleaning
- Make the decision
- Gentle dry brush, compatible wash method and complete drying before storage
- Stop & verify if
- A frame is cracked, hardware is unsafe, or a large panel cannot be handled securely
Jump to a section
- Diagram checkpoints
- Before removing a screen
- A simple cleaning method for removable screens
- Screen material matters: water-only versus mild-soap care
- Manufacturer cleaning reference: a specific example
- Follow the manufacturer when the screen type changes
- Inspect while the frame is clean
- Storage when screens are not in use
- When cleaning reveals a bigger problem
- Worked storage record: two similar screens
- Related guides
- Seasonal handoff checklist
- Primary care references
- After the project: did it work?
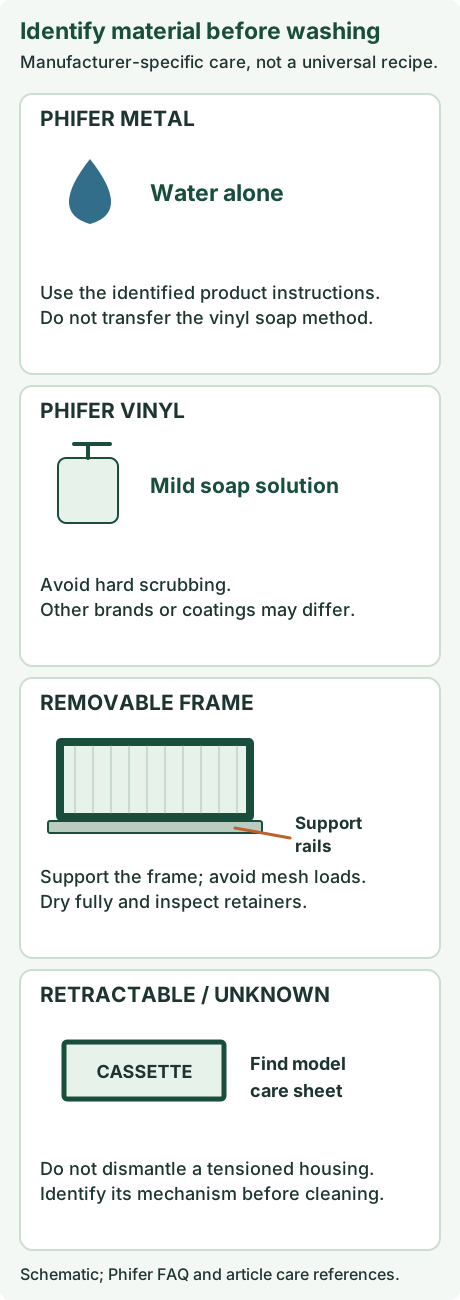
Open desktop diagram ↗ Open mobile diagram ↗
Read the diagram: three checkpoints
- Use soft cleaning tools
- Dry fully before storage
- Avoid bending the frame
Window screens collect dust, pollen and dirt, especially near roads and landscaping. Cleaning can improve visibility through the mesh and help you notice damage early. The important part is using a gentle method that suits the material and frame.
Before removing a screen
Identify the release mechanism for your window and check whether the screen is removable from your side of the opening. Work from a safe position; never lean out through a window or use the mesh as a handhold. If removal requires working at height, consult an appropriate professional.
When in doubt, follow the window or screen manufacturer's cleaning instructions first. Specialty solar fabric, coated metal mesh and proprietary frames may require different products.
A simple cleaning method for removable screens
- Label each screen by room or window so it can return to the same track.
- Inspect the mesh, spline and corners before wetting; record existing tears so you can distinguish them from cleaning damage. Put the screen on a soft, level surface that supports its rails. Avoid pressure on a small unsupported section of mesh.
- Gently remove loose dust with a soft brush or vacuum at low suction using an appropriate soft attachment.
- If the material permits washing, use lukewarm water with a small amount of mild soap and wipe gently with a soft cloth or brush.
- Rinse gently if appropriate, without concentrating a powerful water stream on the mesh or seams.
- Let the screen dry fully before reinstalling or storing it.
Avoid harsh solvents, abrasives and pressure washers unless the manufacturer specifically approves them. Strong jets may stretch mesh, dislodge spline or bend a lightweight frame.
Screen material matters: water-only versus mild-soap care
Phifer's manufacturer screening FAQ gives different cleaning instructions for different materials: rinse its metal screen products with water only; clean its vinyl screening products with a mild soapy solution, avoiding hard scrubbing. This is more precise than treating all removable screens as washable with soap. Phifer's directions are manufacturer-specific, not permission to ignore a different brand's coated metal, retractable-screen or specialty-product care sheet.
On a narrow screen, scroll this table sideways to see every column.
| Fabric or assembly you actually identify | Source-guided care | Stop / check first |
|---|---|---|
| Phifer metal screening in a removable sound frame | The FAQ says water only for its metal products | Corrosion, sharp edges, fragile mesh or non-Phifer coating require its own instructions |
| Phifer vinyl-coated screening | The FAQ allows mild soapy solution, without hard scrubbing | Don't use abrasive brushes, strong solvent or pressure jets |
| Andersen removable framed insect screen | Andersen's named cleaning instructions include mild soapy water with soft brush, rinse and frame drying | Match the exact Andersen screen material and frame before adopting it |
| Retractable cassette or integrated patio screen | Find its mechanism-specific care guidance before washing or moving | Don't remove housing, force a tensioned cassette or lubricate an unknown track |
Worked homeowner decision: two screens have the same opening dimensions and dark-looking mesh. One is known Phifer metal mesh; the other is vinyl-coated fiberglass. Without a material label, their similar appearance doesn't justify choosing one shared detergent. Photograph the installed frame and any roll label, inspect the maker's cleaning chart, and test a safe area only if the manufacturer allows. This avoids trading a bit of dust for coating or retention damage.
Manufacturer cleaning reference: a specific example
Andersen's insect-screen cleaning instructions recommend mild soapy water and a soft-bristle brush for the mesh and frame, followed by rinsing with clean water and drying the frame with a soft cloth. This is an example for Andersen insect screens, not permission to use the same cleaning chemistry on an unidentified specialty or coated screen.
On a narrow screen, scroll this table sideways to see every column.
| Before cleaning | Use this decision rule |
|---|---|
| You know the window's brand/model | Follow that model's cleaning and removal documentation first |
| The screen is removable and the manufacturer permits washing | Support the frame, brush gently, rinse, then fully dry the frame |
| You see corrosion, peeling finish, a fragile joint or loose spline | Stop vigorous cleaning and inspect the damaged component instead |
| The assembly is fixed, high, integrated or difficult to remove safely | Do not lean out or force its retainers; consult the installer or manufacturer |
Documented maintenance interval, not a universal schedule: Andersen's insect screen care article recommends cleaning its screens at least once a year, or at least every three months in coastal, industrial or agricultural settings with greater airborne deposits. Other manufacturers and specialty finishes may set different schedules. Record the actual model and use its care instructions first.
Follow the manufacturer when the screen type changes
A removable framed screen, a gliding patio insect screen, and a retractable cassette are not one cleaning mechanism. Andersen publishes separate care processes for each. The distinctions below are from its named systems; confirm the exact model before copying a step.
On a narrow screen, scroll this table sideways to see every column.
| Observed screen construction | Supported maintenance example | Important boundary |
|---|---|---|
| Removable framed Andersen insect screen | Clean the mesh and frame with mild soapy water and a soft-bristle brush; rinse and use a soft cloth to dry the frame | Do not paint the insect screen frame; coated specialty screening may differ |
| Andersen gliding patio insect screen | Clean the lower track by removing loose debris, then clean mesh/frame as instructed and dry before operation | Do not apply oil-based lubricants or cleaners; residue can attract debris |
| Andersen retractable patio-door screen | Use retractable-specific care for mesh, track and sliding control; its factory preset tension is not a normal DIY adjustment | Do not remove a cassette or copy a rigid framed-screen washing method |
| Unknown coated or fixed specialty screen | Locate the original material/product instructions before wet cleaning or removal | Do not use aggressive chemicals or force an inaccessible release |
This is not a chemical-compatibility chart for every brand: fiberglass, aluminum, coated solar fabric and integrated retractable screening can react differently. A successful cleaning must leave the retention hardware and track functioning, not just remove visible dirt.
Storage is a structural support problem, not simply a dry cupboard
Andersen's removal and storage instructions specify cleaning before storage, keeping the area dry and ventilated, and fully supporting the frame flat or upright so it does not bow. They also warn against weight or falling items on either frame or mesh. This is why leaning several flexible screens against an uneven wall without support may be worse than leaving them installed.
Two-screen example: a 24 × 36 in mesh panel and a 24 × 36 in retractable cassette can have equal visible dimensions but require different removal and storage procedures. Do not count shared width/height as proof that the assemblies can be stacked, washed or dismantled identically.
Inspect while the frame is clean
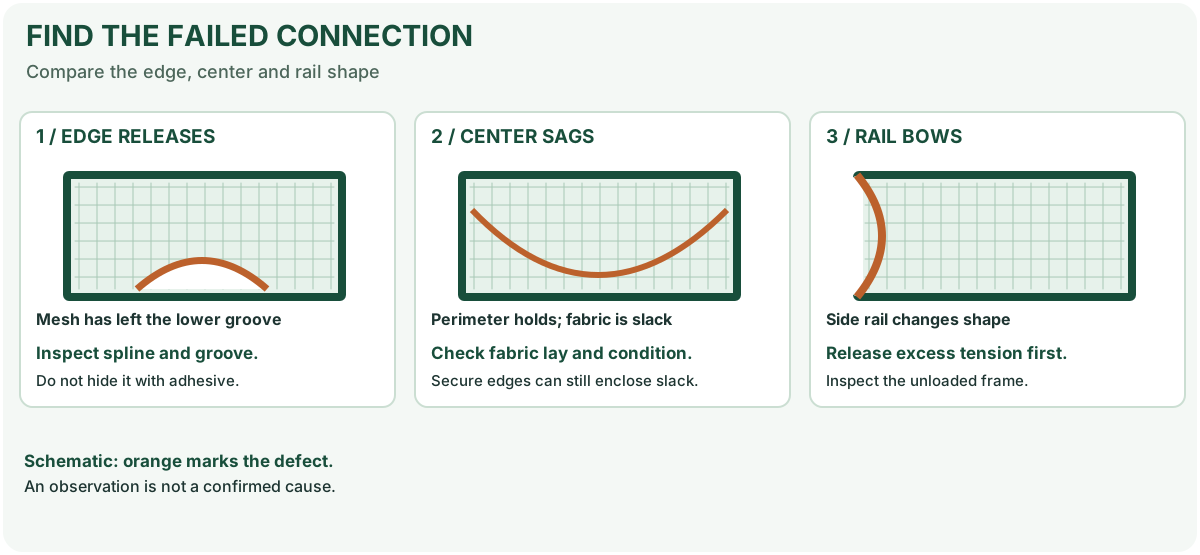
Look for small tears near corners, brittle spline, loose tabs and dirt trapped inside the groove. If you find a loose edge, diagnose the mesh and spline before it opens further.
For any screen that no longer sits squarely, measure both diagonals and inspect the rails rather than reinstalling it by force.
Storage when screens are not in use
A screen is easiest to protect when stored upright or flat with proper support, depending on the manufacturer's guidance and available space. Keep it away from heavy objects, sharp garden tools, direct contact with heat sources and places where it can be stepped on.
If storing several frames together, place clean soft separators between them and avoid stacking loads on a mesh surface. Attach removable labels to the frame rather than covering the mesh with strong adhesive.
When cleaning reveals a bigger problem
On a narrow screen, scroll this table sideways to see every column.
| Finding | Reasonable next step |
|---|---|
| Mesh hole or torn edge | Inspect for mesh replacement |
| Spline hardened or detached | Verify the correct replacement size |
| Frame rail visibly kinked | Inspect repair versus frame replacement |
| Broken mounting tab | Identify window-specific replacement hardware |
| Persistent residue on specialty mesh | Check manufacturer's cleaning instructions |
Worked storage record: two similar screens
Illustrative example: two bedroom screens have nearly the same width, but one uses a different clip arrangement. Label them by room and opening, then record orientation and hardware before removal. A shared size label alone would lose the information needed for correct reinstallation. This is a planning example, not a completed MendNook repair.
On a narrow screen, scroll this table sideways to see every column.
| Record field | Example entry | Purpose |
|---|---|---|
| Location | Bedroom, left opening | Returns the frame to its original window |
| Orientation | Pull tab toward room | Preserves the observed installation |
| Existing defect | Lower corner loose before washing | Separates cleaning from a repair decision |
| Ready for storage | Frame dry; rails supported | Avoids trapping moisture or loading the mesh |
Do not store a damp stack in a sealed wrap. Keep heavy items off the mesh and separate frames so protruding clips cannot press into the next sheet. On reinstallation, confirm that the original retainers engage before releasing the frame. Stop if it only fits when bent or forced.
Related guides
- Replace fiberglass mesh without replacing the frame
- How to choose the right spline size
- Check a bent or twisted frame
Seasonal handoff checklist
Before putting screens away for the season, make a short inventory rather than relying on memory. For each screen, record room/window, which side faces out, damaged corners or tabs, and whether mesh or spline needs attention. A removable tag attached to the frame—not the mesh—keeps the note with the correct item.
When you reinstall a stored screen, check the retainers before letting go of the frame. If clips are missing or the rails do not seat easily, stop and consult the window's retention instructions. Do not leave a poorly secured screen in an opening simply because the mesh is clean.
Primary care references
- Phifer — DIY Screening FAQs — separate water-only metal screening care from mild-soap vinyl care.
- Andersen — Clean Your Insect Screen's Mesh and Frame — named-screen cleaning method and recommended frequency.
- Andersen — Product Care — additional screen and track care procedures.
- The Home Depot — How to Repair or Replace Screens — repair context rather than a cleaning specification.
- Andersen — Proper Removal and Storage of Insect Screens — structural support and dry/ventilated storage.
- Andersen — Gliding Patio Insect Screen Care — track cleaning and oil-based-product restrictions.
- Andersen — Retractable Screen Care — separate mechanism and factory-tension precautions.
After the project: did it work?
After completing only product-approved work, document what you actually observe instead of assuming a replacement part resolved the fault.
- Success looks like
- The screen is clean and fully dry, with mesh, corners, retainers and frame checked before safe flat/upright storage.
- If it still fails
- If corners loosen, mesh tears or the frame is distorted, repair these before packing or reinstalling.
- Keep for next time
- Window identifier; damage photos; storage location; follow-up inspection date
Keep your actual measurements and observed result in your private project notebook. This is a verification checklist, not a product certification.
My project record: progress and take-home checklist
Select a progress stage if helpful. This is a personal record only, not a claim that MendNook verified your repair.
Includes this guide's specific diagnosis, decision, safety, and outcome checks, plus any note entered above. Nothing is sent to MendNook; downloads and copy operations stay under your control.