Roller fabric can drift sideways even with correct tension. Confirm bracket level and drift before any permitted tube correction.
Before you buy or repair
- Record first
- Tube level, bracket seating, direction of side drift and shade material/control system
- Make the decision
- Correct bracket alignment first, then consider only manufacturer-approved fabric tracking method
- Stop & verify if
- Fabric rubs and tears, the roller tube bends or the control system is motorized and undocumented
Jump to a section
- Diagram checkpoints
- Step 1 — Find which component is crooked
- Step 2 — Record the side of movement consistently
- Step 3 — Decide whether an opposite-side shim is appropriate
- Step 4 — Recheck after any manufacturer-approved correction
- The two-product test: do not copy a shim fix from a different mechanism
- When adjustment is not the correct repair
- Primary sources and limitations
- After the project: did it work?
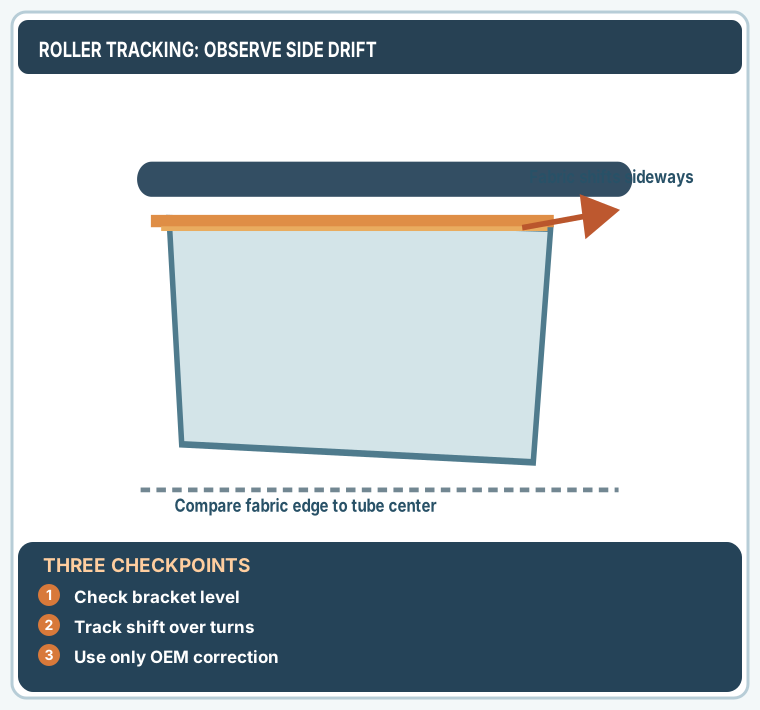
Open desktop diagram ↗ Open mobile diagram ↗
Read the diagram: three checkpoints
- Check bracket level
- Track shift over turns
- Use only OEM correction
A roller shade that telescopes winds its fabric sideways across the roller tube as it rises. The edge may rub against a bracket, buckle or stop before reaching its normal height. Do not start by changing spring tension: rolling force and sideways fabric tracking are different faults.
The useful diagnosis separates three things: is the tube level, is the fabric travelling sideways, and does the exact product maker authorize a corrective shim? Blinds.com's roller-shade repair guidance describes a small masking-tape shim for some fabric telescoping. It is not a universal fix for every cordless, cassette, motorized or dual-fabric system.
Step 1 — Find which component is crooked
Observe a short raise/lower cycle from directly in front of the installed shade, with hands clear of the roller and chain mechanisms. Do not operate it if it is falling out of its brackets, pulling at the fabric attachment or scraping sharply.
On a narrow screen, scroll this table sideways to see every column.
| Observation | Most useful check | What not to assume |
|---|---|---|
| Entire roller/headrail tilts toward one side | Bracket level, seating, sound mounting surface | A tape shim will level an unsafe bracket |
| Tube looks level, fabric walks left/right as it winds | Fabric attachment and manufacturer tracking guidance | Increasing spring tension fixes sideways travel |
| Bottom hem bar hangs at an angle even fully lowered | Fabric skew, uneven lower bar, mounting reference | A crooked window sill is a reliable level |
| Fabric edge scrapes the end cap | Clearance, tube alignment, product width and warranty | Continued operation is harmless |
| Whole mechanism wobbles or squeaks | Loose bracket, damaged end bearing or clutch | Repeated cycling or stronger pulling is safe |
A rigid spirit level is more informative than looking at the hem bar against a sloped floor or window trim. Check the tube/bracket reference specified by the product maker. If a bracket is loose in damaged drywall or trim, stop before making any tracking adjustment.
Step 2 — Record the side of movement consistently
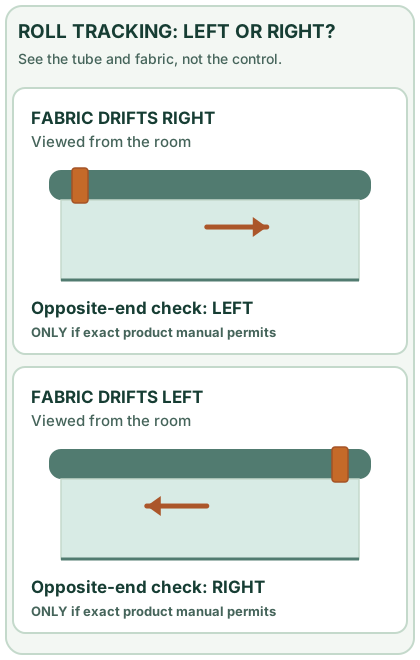
Use viewed from the room, facing the shade as your left/right reference. Note whether fabric moves toward the left end or the right end of the roller during upward travel.
You can take three straight-on photos after approximately one, three and five rotations if that is within the product's ordinary travel range and nothing rubs. Record a small observed movement only to show the symptom changing over time.
Hypothetical note: “Tube looks level, roll starts centred, fabric edge moves about 1/4 inch right after three rotations.” This does not establish an allowed tolerance, a precise shim size or a manufacturer defect. If the edge already scrapes after one rotation, stop the test rather than waiting for five.
Step 3 — Decide whether an opposite-side shim is appropriate
For products whose exact manual authorizes this method, the Blinds.com roller repair page describes lowering the shade to see the attachment area and adding a small piece of masking tape at the tube attachment on the opposite end from the telescoping direction. It also notes that some designs may need an additional small piece.
On a narrow screen, scroll this table sideways to see every column.
| Fabric travels toward (viewed from room) | Manufacturer's opposite-end principle | Only if this exact product approves tape |
|---|---|---|
| RIGHT end | Check whether a small permitted shim belongs near the LEFT attachment end | Confirm tape type, location and safe travel in its manual |
| LEFT end | Check whether a small permitted shim belongs near the RIGHT attachment end | Confirm tape type, location and safe travel in its manual |
| No consistent sideways drift | Do not apply a tracking shim | Investigate other issues first |
The manufacturer rule describes the opposite side of fabric travel, not necessarily the opposite side of the control chain. Control placement, regular/reverse roll and tube orientation can change how a particular installation looks. If the product manual specifies a different arrangement, follow that manual, not a generic left/right table.
Do not copy a tape technique to motorized limit switches, a dual-sheer cassette, spring cartridges or unapproved coated fabrics. Tape can transfer adhesive, wrinkle fabric, increase edge pressure or affect warranty. If the specified roller attachment area is inaccessible without removing covers or disengaging a tensioned mechanism, stop and contact product support.
Step 4 — Recheck after any manufacturer-approved correction
- Confirm the bracket is securely fitted and the roller is installed correctly. Do not adjust an insecure fixture by modifying the fabric roll.
- Consult the current model-specific user/installation guide and check whether a tracking adjustment is permitted.
- If permitted, apply only the smallest reversible step described by that guide. Do not detach fabric, apply random layers or unwind beyond the allowed lower stop.
- Raise and lower slowly through the normal range while watching clearance at both ends.
- Record whether drift decreased, stayed the same or changed sides. Remove/reverse only as instructed; do not improvise if the outcome worsens.
- Stop if fabric catches, the hem bar tilts, a chain tensioner loosens or the mount starts to move.
Blinds.com's installation guidance also requires checking level and smooth movement after mounting. Its bracket placement examples are product-category instructions, not universal screw locations.
The two-product test: do not copy a shim fix from a different mechanism
The public Blinds.com roller repair article describes the opposite-end masking-tape method under fabric telescoping. In the same document, it sends some beaded-chain and cordless incomplete-rise problems to service support instead of prescribing the same action. That is a useful warning: the symptom and the control mechanism both matter.
On a narrow screen, scroll this table sideways to see every column.
| User's real installation | Observe before considering any shim | Appropriate next action |
|---|---|---|
| Open, traditional roller with visible fabric-to-tube attachment | Is the tube level and securely supported? Is drift consistently right/left during normal travel? | Ask if the exact SKU's repair instructions permit the cited reversible attachment-area method |
| Cassette/dual-fabric system concealing the roller | Does fabric touch an internal side guide or housing at one height? | Don't open the cassette, disconnect a drive or apply tape to a surface that cannot be safely accessed |
| Motorized roller that stops on its own | Is a programmed stop, fabric-edge snag or drive alert involved? | Follow motor/limit documentation or request service; a masking tape example cannot reset electronics |
| Roll travels straight but hangs crooked at full extension | Compare bracket level, hem bar and available mounting space | Do not add a fabric shim just because the bottom edge appears sloped |
Repeatable support evidence: Photograph the fully lowered shade with the tube and both brackets visible; photograph it again after one normal partial raise at the first sign of drift; then record the distance from the fabric edge to its nearby tube end using the same reference point. Stop the cycle immediately if rubbing begins. Record the controller type, product ID, room-view left/right and whether the whole bracket moves.
Pass/fail after an approved correction: The roll remains centered without contacting the housing during its ordinary travel, brackets remain secure, and the control operates as originally designed. If one small change makes the fabric drift in the opposite direction, that does not authorize piling on additional tape or modifying springs. Remove the trial only by the approved method and seek product-specific support.
When adjustment is not the correct repair
A bent tube, loose end bearing, peeling fabric attachment, falling cassette or recurring severe drift needs a product-specific service decision, not more tape. Gather the manufacturer, shade series/SKU, control type, approximate width and height, photos showing drift direction, and the results of safe checks for a support or warranty request.
If the shade fails to roll up at all, use the won't-roll-up diagnostic. If the shade is a different blind type, do not transplant this roller-specific procedure to a cordless cellular or slatted blind.
Primary sources and limitations
- Blinds.com: How to repair roller shades — explicitly distinguishes fabric telescoping and describes the opposite-end masking-tape approach for applicable rollers.
- Blinds.com: How to install roller shades — checking installation level, smooth travel and mounting.
- Blinds.com: Roller-shade measuring guide — product-specific mounting/fit distinctions and dimensional context.
Evidence boundary: This is an interpretation of published seller instructions and hypothetical observations, not a report of independently tested shades or proof that tape is safe on your particular fabric. No brand has approved a generic modification to your model.
After the project: did it work?
After completing only product-approved work, document what you actually observe instead of assuming a replacement part resolved the fault.
- Success looks like
- After gentle cycles the fabric winds near center without progressive side drift, creasing or rubbing end brackets.
- If it still fails
- If fabric keeps telescoping or mounts loosen, stop further operation and document tracking for product service.
- Keep for next time
- Brand/control; bracket level; side drift after cycles; approved correction
Keep your actual measurements and observed result in your private project notebook. This is a verification checklist, not a product certification.
My project record: progress and take-home checklist
Select a progress stage if helpful. This is a personal record only, not a claim that MendNook verified your repair.
Includes this guide's specific diagnosis, decision, safety, and outcome checks, plus any note entered above. Nothing is sent to MendNook; downloads and copy operations stay under your control.