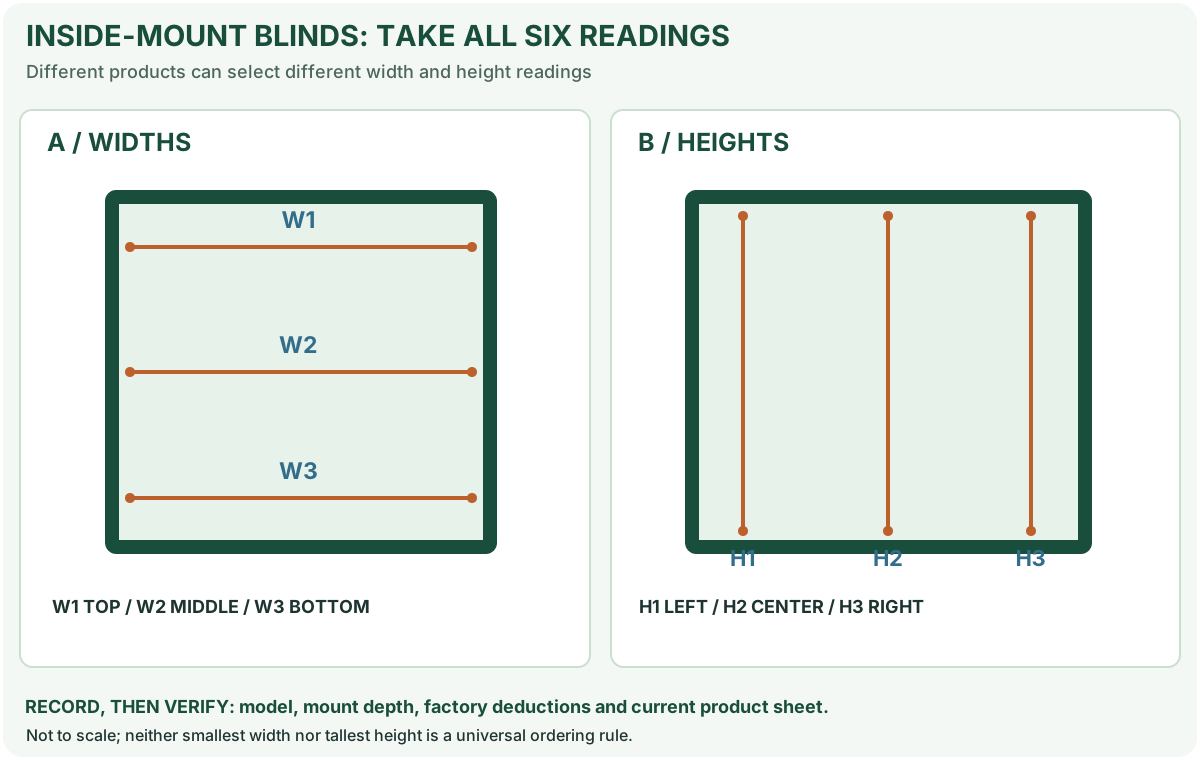
Plan the intended coverage outside the opening, but confirm whether the seller asks for fabric width or complete headrail width.
Before you buy or repair
- Record first
- Actual opening, desired side overlap, headrail clearance and mounting substrate
- Make the decision
- Covering geometry separately from manufacturer-defined ORDER size and hardware width
- Stop & verify if
- Brackets would mount in weak material, the shade blocks hardware or cord safety is unresolved
Jump to a section
- First decide what the measurements describe
- Read the diagram: three checkpoints
- A source-backed example: identical opening, different products
- Source conflict resolved: three different outside-mount order widths
- Measure the mounting area, not just the coverage rectangle
- Height calculation: two outcomes from the same opening
- Before paying: the six-question supplier check
- A quick decision table
- Primary sources and scope
- After the project: did it work?
An outside-mount blind attaches to the wall or trim in front of the window opening. It is useful when the recess is too shallow, there is an obstructing crank, or an inside-mount shade would leave unwanted light gaps. The critical decision is not merely how much overlap to add: what dimension does your chosen product's ordering form actually request? A headrail can be wider than the fabric beneath it.
First decide what the measurements describe
Write the exact product name and mount type on your worksheet. Measure with a steel tape from a consistent reference; do not substitute glass width for the opening you want covered.
On a narrow screen, scroll this table sideways to see every column.
| Your record | Meaning | Is it automatically the size to order? |
|---|---|---|
| Window opening width and height | Visible area to cover | No |
| Left and right overlaps | Coverage beyond each opening edge | No |
| Desired fabric coverage width | Opening width + both chosen overlaps | No, unless that product explicitly orders by fabric width |
| Headrail / bracket-to-bracket width | Space occupied by the installed mechanism | No, until verified against the ordering form |
| Manufacturer's specified order width | The exact definition for that product and series | Yes, after verifying all other mounting requirements |
The outside-mount planner adds overlaps to the opening dimensions. Its result is a coverage goal, not an automatically approved ordering size.
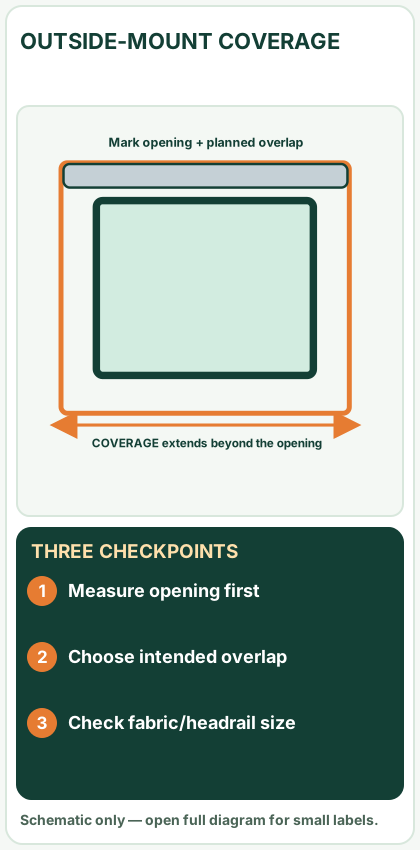
Open desktop diagram ↗ Open mobile diagram ↗
Read the diagram: three checkpoints
- Measure opening first
- Choose intended overlap
- Check fabric/headrail size
A source-backed example: identical opening, different products
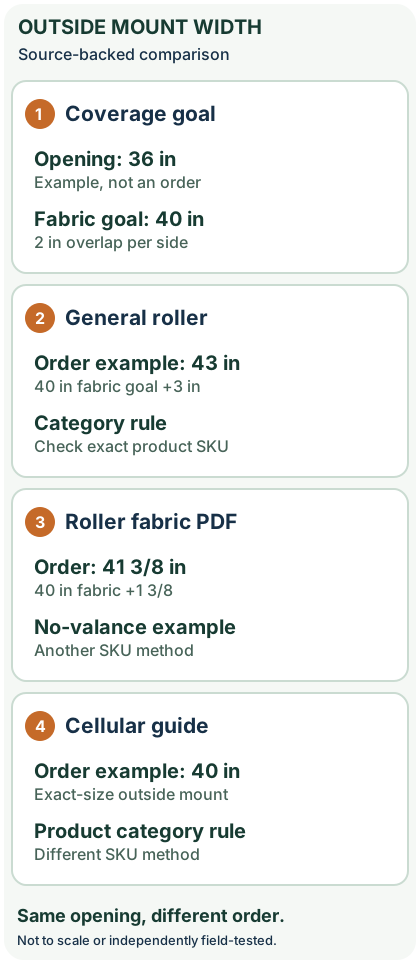
For a 36-inch opening and 2 inches of desired fabric overlap per side, the desired fabric coverage is 36 + 2 + 2 = 40 inches. The order width depends on whether the chosen product sells fabric width, headrail width or bracket-to-bracket width. Compare the three documented conventions below before entering a number at checkout.
Source conflict resolved: three different outside-mount order widths
The preceding roller and cellular examples describe two categories, but a buyer must also distinguish category guidance from a product-family PDF. Blinds.com's specific roller fabric-measurement sheet shows an outside-mount, no-valance shade whose fabric is 1 3/8 in narrower than the nominal order/fully installed width. This differs from the retailer's general roller measuring instructions, which use 3 in added to desired fabric width for an outside-mount bracket-to-bracket example. The two instructions are not interchangeable and may describe different products or configurations.
For the same hypothetical 36-in opening, wanting 2 in fabric overlap at each side gives 40 in actual fabric coverage. Only after the specific SKU confirms which size definition applies can you calculate:
On a narrow screen, scroll this table sideways to see every column.
| Published measuring convention | Target fabric width | Illustrated order width | Why the answer differs |
|---|---|---|---|
| Blinds.com general roller-shade category example | 40 in | 43 in | Add 3 in between intended fabric coverage and bracket-to-bracket size |
| Blinds.com no-valance roller configuration in its fabric PDF | 40 in | 41 3/8 in | That sheet shows fabric 1 3/8 in less than order width |
| Blinds.com outside-mount cellular category | 40 in | 40 in | The category guide describes ordering the specified complete shade width |
These are three separate hypothetical order scenarios, not three interchangeable choices for one SKU. The second PDF also distinguishes valance/cassette configurations and illustrates a 48-in order with 46 5/8 in fabric; it is evidence of that sheet's convention, not a universal roller allowance. The retailer's broader measure page gives still more general overlap guidance, so do not mix a generic blog/landing-page recommendation with a SKU's current installation sheet.
The no-regret checkout checklist
- Record actual opening width, desired left/right fabric coverage, and bracket-to-bracket available space in distinct boxes. If the available wall is only 42 in, a 43-in bracket width cannot fit even though 40-in fabric coverage sounds attractive.
- Get the current product's finished fabric width versus ordered width definition in writing. Verify whether a cassette, valance, clutch or control-side projection changes it.
- Confirm the actual bracket fixing surface and manufacturer-required support spacing before drilling or ordering. A wider fabric target may be impossible without obstructing a handle or door swing.
- Do not order from these examples if the chosen SKU's product page states a different deduction. Ask the seller which specification and revision governs that exact item.
To compare these rules visually, use the annotated original diagram on this page. Its widths are teaching labels, not drawings to scale or independently measured products.
Measure the mounting area, not just the coverage rectangle
Before deciding whether the target coverage is practical:
- Measure the full opening width and height and note whether trim should be covered or left visible.
- Mark your intended headrail top, left bracket and right bracket positions using removable marks.
- Check the manufacturer's required flat, structurally suitable bracket area; plasterboard, narrow trim, hollow material and hidden services require more than arithmetic.
- Check window crank/handle clearance, door swings, window ventilation and the shade's rolled-up or stacked size.
- Choose a bottom endpoint relative to the sill, floor or other obstruction. Do not blindly add a standard bottom overlap if a protruding sill prevents it.
- Record width and height separately in the format the vendor requests. Follow its rounding rule rather than automatically rounding in one direction.
If bracket space is missing or the fabric would rub a handle, revise the mounting design before ordering. A larger size does not fix an unsafe support surface.
Height calculation: two outcomes from the same opening
For an opening 48 inches high with a desired top extension of 3 inches and bottom extension of 2 inches, your target vertical coverage is 48 + 3 + 2 = 53 inches. If the bottom must stop at a projecting sill, the 2-inch extension may be impossible and the proposed ending point changes. Confirm the product's definition of ordered drop and how the headrail or cassette changes its position.
For comparison, the Blinds.com roller guide gives different starting/ending measurement instructions depending on whether there is a projecting sill. A 53-inch drawn rectangle does not automatically mean a 53-inch shade should be ordered.
Before paying: the six-question supplier check
Use this text when the order page is unclear:
“For this exact model and outside mount: does the order width mean bracket-to-bracket, complete cassette/headrail, or the finished fabric width? What is the expected fabric deduction for this SKU? How much flat surface and side clearance do the mounting brackets need? How is finished drop measured? Will the factory make any additional deductions? Which current measuring sheet controls if another PDF differs?”
Keep the reply with your measurement worksheet. In a home with young children, check the current U.S. CPSC window-covering safety guidance or the rules applicable to your market; an accurate measurement does not make an unsafe chain or cord acceptable.
A quick decision table
On a narrow screen, scroll this table sideways to see every column.
| What you observe | Better next step |
|---|---|
| You know the opening size but not the product | Calculate a coverage goal only, then choose a compatible model |
| The seller lists fabric width separately | Match that field to desired coverage, then confirm rail and bracket dimensions |
| The seller lists only order width | Obtain the product-specific relationship between ordered width and fabric width |
| Left and right mounting surfaces are unequal | Draw both bracket positions; do not center solely by glass |
| A projecting sill or handle is in the way | Reconsider mount position, type or bottom endpoint |
| An old PDF conflicts with the current SKU specs | Stop and ask the seller which version applies |
Use the coverage planner for arithmetic, the inside-vs-outside mount decision guide for choosing a mounting type, and the tape fraction converter to preserve accurate readings. None of these tools certifies bracket strength or a finished order dimension.
Primary sources and scope
- Blinds.com: How to measure roller shades — fabric narrower than order width, category-specific order-width method and sill cases.
- Blinds.com: How to measure cellular shades — category-specific outside mounting and overlap guidance.
- Blinds.com: roller shade fabric measurements (PDF) — illustration of another roller system with a distinct fabric deduction.
- LEVOLOR PREMIER January 2025 general guidelines (PDF) — product-range outside-mount measuring examples.
Evidence limit: This article compares manufacturer documents and shows the arithmetic on illustrative measurements; MendNook has not installed, ordered or independently tested the hypothetical 36-inch window, and these instructions do not establish universal tolerances.
After the project: did it work?
After completing only product-approved work, document what you actually observe instead of assuming a replacement part resolved the fault.
- Success looks like
- Intended left/right/top/bottom coverage and support locations are recorded, and the chosen product's order-width definition is confirmed.
- If it still fails
- If brackets lack a suitable mounting substrate or fabric clearance is uncertain, verify the vendor's mounting sheet first.
- Keep for next time
- Coverage dimensions; bracket location; product model; mounting clearance
Keep your actual measurements and observed result in your private project notebook. This is a verification checklist, not a product certification.
My project record: progress and take-home checklist
Select a progress stage if helpful. This is a personal record only, not a claim that MendNook verified your repair.
Includes this guide's specific diagnosis, decision, safety, and outcome checks, plus any note entered above. Nothing is sent to MendNook; downloads and copy operations stay under your control.