Replacement vane orders may require headrail-to-vane bottom drop, not material-only length; verify carrier hook and finish.
Before you buy or repair
- Record first
- Vane width and hanger shape, existing installed drop, floor clearance and exact seller conventions
- Make the decision
- Choose replacement vanes matching carrier, material and ordering measurement type
- Stop & verify if
- The headrail carrier is broken, vanes repeatedly fall or a safety chain is missing
Jump to a section
- Diagram checkpoints
- Diagnose the failure before shopping
- Measure the correct length, not just the old material
- Worked replacement worksheet
- Translate the supplier's height field before ordering
- Do not mistake a full vertical-blind order form for replacement-vane sizing
- Match more than color
- A no-waste parts and height confirmation
- Replace a vane safely
- What to do if the new vane twists or falls out
- Record the result and next project
- References and limitations
- After the project: did it work?
Open desktop diagram ↗ Open mobile diagram ↗
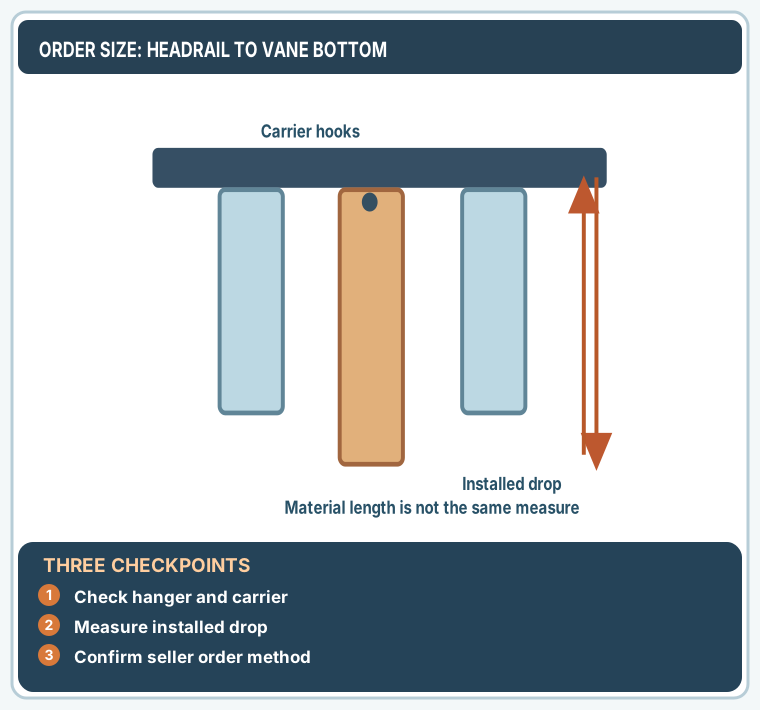
Read the diagram: three checkpoints
- Check hanger and carrier
- Measure installed drop
- Confirm seller order method
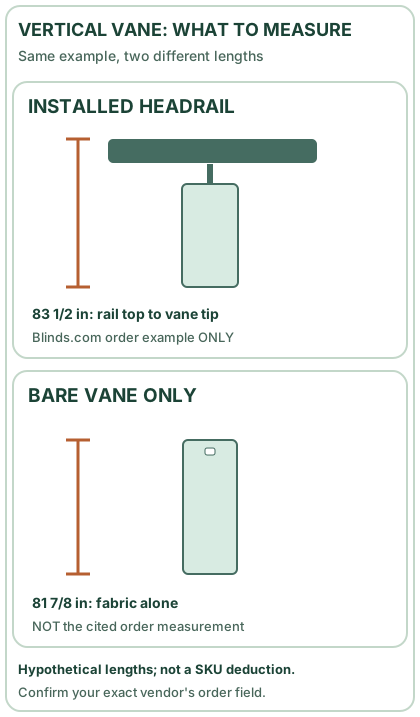
A cracked, twisted or missing vertical-blind vane usually does not require replacing the entire headrail. But vanes aren't simply strips cut to the glass opening. The carrier hook, vane width, thickness, attachment slot, fabric weighting and finished drop all affect fit. Order the wrong length and the new vane drags on the floor; choose the wrong hanger opening and it can fall from the track.
Diagnose the failure before shopping
Check whether the vane material itself is split at its top hole or whether the carrier hook/stem in the headrail is broken. A vane with an intact hanging slot can be reused if only its weights or chain need attention and the product permits a compatible replacement. If the plastic carrier is snapped, a new vane will not restore it.
On a narrow screen, scroll this table sideways to see every column.
| Observation | Likely replacement | Evidence to collect |
|---|---|---|
| One PVC vane cracked midway | Matching vane with correct width and finish | Original vane width/drop, product line |
| Top vane hole ripped | Matching vane or approved repair, if offered | Hanger/slot geometry |
| Headrail hook missing | Correct carrier stem or mechanism | Close-up of carrier, series |
| Fabric vane weight absent | OEM approved weight/chain system | Bottom pocket/chain profile |
| Entire set uneven at bottom | Headrail level or wrong lengths | Top reference and several actual drops |
Blinds.com's vertical blind repair page describes releasing the vane using a slim plastic card on certain hook designs; it is not universal for every snap-in carrier.
Measure the correct length, not just the old material
Blinds.com's measurement guide gives a product-specific rule for replacement vanes: measure from the top of the headrail to the bottom of the vane, rather than only measuring the bare vane fabric or vinyl. A different vendor may require the finished vane length or an exact part number. Verify which measurement convention appears on the order form.
Take three dimensions separately: nominal vane width across its broad face, physical material length, and installed headrail-to-bottom drop. If an old vane is torn or curled, compare a surviving flat one. Record the floor/sill clearance.
Worked replacement worksheet
Imagine an original installed vane drops 83 1/2 inches from the headrail top to its bottom. The material-only section measures 81 7/8 inches when removed. These two readings differ by 1 5/8 inches because the hang point and carrier geometry are not included in the material measurement. An order form asking for headrail-to-vane bottom must not receive the 81 7/8-inch figure.
This is a geometry example, not a universal carrier offset or cutting allowance. The supplier determines the correct finished drop.
Translate the supplier's height field before ordering
The same original blind can produce three different height numbers. Do not copy a number into the seller's form until its label says what that number represents. For the hypothetical vane above:
On a narrow screen, scroll this table sideways to see every column.
| Form or worksheet field | What to enter or retain | Why |
|---|---|---|
| Replacement vane height when the form explicitly follows Blinds.com's headrail-top rule | 83 1/2 in: installed headrail top to vane bottom | The source asks for installed drop, not just the removed material |
| Bare replacement material length if another manufacturer explicitly asks for the piece alone | 81 7/8 in: removed, straightened original vane | Only use when the named seller confirms this different convention |
| Desired floor/sill clearance | Measure and record separately at the location of the blind | A clearance target is a check, not automatically a deduction from either order field |
| Manufacturer SKU or unknown ordering convention | Leave the order size unconfirmed, send photos and both readings | A complete blind, a vane-only kit and a carrier replacement may use different specifications |
When no original vane survives: measure the installed headrail position and the needed endpoint, but do not infer the hook-to-vane offset from a neighboring blind in another room. Ask for the exact carrier and replacement-vane drawing. When the headrail has been removed: you cannot truthfully record an installed headrail-to-vane-bottom measurement until its intended installed position is verified.
This distinction is why a sample-compatible vane, where the seller permits one, is a better first purchase than a full set when the carrier interface, drop convention or color match is uncertain.
Do not mistake a full vertical-blind order form for replacement-vane sizing
Blinds.com publishes two separate rules in two official guides. Its replacement-vane instruction asks for the height from the existing headrail's top to the installed vane's bottom. Its complete inside-mount vertical-blind measuring guide instead asks for the width of the actual window opening at the top, the shortest of three opening heights, and specifies no buyer-side factory deduction for that complete blind. Neither form has the same measurement start and end points.
On a narrow screen, scroll this table sideways to see every column.
| Customer order | What is measured | Why copying the other number fails |
|---|---|---|
| One replacement vane for a headrail still installed | Top of the installed headrail to bottom of a working original vane, per the cited vane ordering rule | Measuring window opening height would ignore the original headrail placement and hook-to-vane suspension |
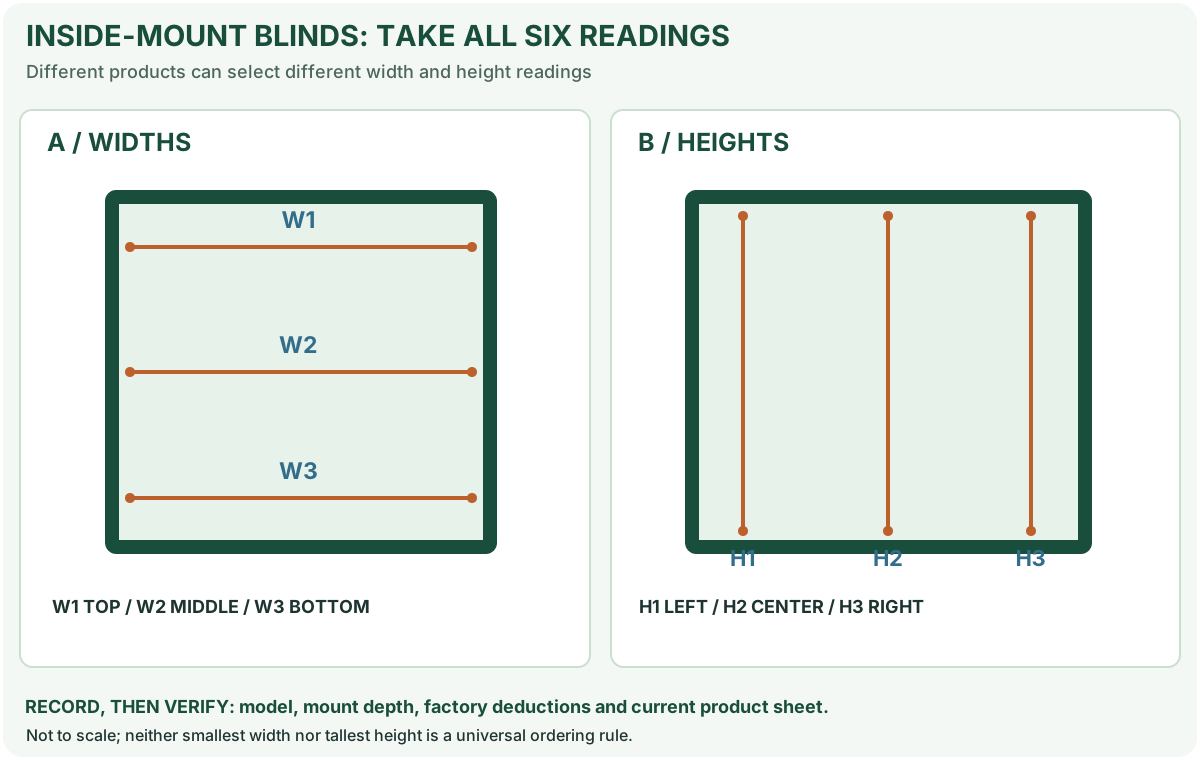
| A complete inside-mount vertical blind | Opening width at the top; height at left, center, right; submit the shortest height after the selected product's specified precision rule | Copying an existing vane's installed drop cannot tell the maker your actual bracket depth, opening geometry or desired clearance |
| A replacement carrier hook/stem | Part number, original hook geometry and headrail series, not just any height | Neither full-opening size nor vane length establishes hook compatibility |
Illustrative two-order trap: A broken vane's old headrail-to-bottom distance is 83 1/2 in; a new inside-mount full blind would instead be ordered from measured opening height at left 84 1/8, center 84, and right 83 7/8 in. The shortest opening height is 83 7/8 in, not 83 1/2. Neither measurement is inherently wrong; each describes a different object and applies only to its vendor's named order field.
Round only where that vendor requests it: Blinds.com's complete vertical blind guide instructs recording to the nearest 1/8 in and rounding a 1/16-in mark down to the lower 1/8. That instruction applies to its new-blind measuring procedure; it does not grant permission to truncate any manufacturer's exact replacement-vane measurement or hide a mismatch. Confirm the precise replacement SKU and seller's form before making an irreversible cut.
Best next step when unsure: Send the supplier a labeled photo showing top of installed headrail, bottom of undamaged vane, hanger/clip interface, and separately the opening width/three heights only if shopping for a complete blind. Ask exactly which fields its replacement-vane form requires. If the hook is broken, identify that original headrail/carrier before paying for fabric.
Match more than color
Photograph the hanging slot, front/back texture, material stiffness, vane width and edge profile. Check whether the product is a rigid vinyl/PVC vane, fabric insert with weights, or a specialty perforated vane. Different materials may have different overlap, light transmission and cleaning rules. A near color match can still look inconsistent in daylight if sheen and rotation differ.
When ordering a whole set, confirm whether the carrier spacing and existing headrail support the chosen vane width. Do not mix 3 1/2-inch and narrower vanes in one installed set without manufacturer approval.
A no-waste parts and height confirmation
Before ordering a complete replacement set, inspect one surviving undamaged vane and its matching carrier. With the blind at rest, make a simple five-item photo/measurement record:
- The headrail from the room side with the vane installed, so the original orientation is clear.
- A close-up of the hanger slot and plastic carrier hook. One torn vane slot is not proof that the carrier itself needs replacing.
- The actual vane face width and installed headrail-top to vane-bottom drop, recorded separately from bare-material length.
- The surface finish and material family. A fabric vane with a bottom weight or chain is not a direct substitute for any rigid vinyl vane.
- The clearance above the floor or sill, measured with the neighboring undamaged vane as a reference.
On a narrow screen, scroll this table sideways to see every column.
| Proposed purchase | Confirm first | Why it matters |
|---|---|---|
| One matching replacement vane | Identical hanger slot, nominal width, finish and actual seller ordering convention | Prevents a piece that hangs but is visibly too low or twists |
| Complete set of vanes | Existing carrier pitch, weight system and available stacking space | A different vane width may create overlap or traverse problems |
| New carrier/stem | Original mechanism series, carrier shape and part number | A replacement strip cannot repair broken plastic in the headrail |
Blinds.com's measurement instructions explicitly distinguish replacement-vane installed drop from the bare vane length for its order method. Its repair instructions describe a thin-card release for compatible holders, but that does not prove all carrier designs can be released in the same way.
Buying decision: When you cannot positively identify the carrier interface, contact the original blind seller or maker with the photos rather than ordering by a stock image. Stop if a headrail bracket is loose or a child-safety device would need removal.
Replace a vane safely
- Position the blind using the manufacturer-approved opening position so the individual carrier is accessible.
- Support the headrail and work from a safe floor position; do not stand on furniture.
- On compatible hook designs, use the maker's documented card-release technique without twisting the carrier.
- Confirm the old vane slot versus new vane hanger hole before inserting.
- Snap or slide the new vane into the designated hook with only intended force.
- Reinstall fabric weights or chains if supplied/required, keeping child-safe tensioning devices intact.
- Rotate all vanes and traverse the track slowly. Check that the new vane hangs with the same face and height as neighboring vanes.
If the carrier breaks when contacted, stop. Replacing the vane will not fix a carrier alignment problem.
What to do if the new vane twists or falls out
Check whether you inserted it from the wrong side, the slot is incompatible, a neighboring vane has caught the hook, or the carrier stem itself is worn. Do not enlarge the plastic hanging hole with a knife. A replacement that repeatedly drops could create injury risks for children and pets, so ask the maker for the correct carrier or vane assembly.
For an entire headrail that no longer rotates, follow vertical blind rotation diagnosis rather than buying a new set of vanes.
Record the result and next project
In your page notebook, save: seller SKU, exact width, ordering measurement type, drop, count, handedness/orientation and any unresolved color difference. After installation, verify all vanes clear the floor by their intended amount and that the blind opens, closes and rotates normally. Keep the order record for future replacements.
References and limitations
- Blinds.com: Vertical blinds repair and vane handling.
- Blinds.com: Complete inside-mount vertical blind dimensions — top opening width, shortest of three heights, and factory-deduction convention for full blinds, not individual vanes.
- Blinds.com: Measurement rules for replacement vertical vanes.
- Blinds.com: Vertical blind installation and safe operation.
MendNook did not test these replacement vanes in a real headrail. Exact carrier interface and order-size conventions are manufacturer-specific.
After the project: did it work?
After completing only product-approved work, document what you actually observe instead of assuming a replacement part resolved the fault.
- Success looks like
- Replacement vanes hang at the intended drop, fit their carrier hooks and rotate/traverse without detaching.
- If it still fails
- If a hanger cannot retain the new vane or it drags, verify supplier's order-length convention and hook compatibility.
- Keep for next time
- Vane model/width; headrail-to-bottom drop; carrier profile; installed check
Keep your actual measurements and observed result in your private project notebook. This is a verification checklist, not a product certification.
My project record: progress and take-home checklist
Select a progress stage if helpful. This is a personal record only, not a claim that MendNook verified your repair.
Includes this guide's specific diagnosis, decision, safety, and outcome checks, plus any note entered above. Nothing is sent to MendNook; downloads and copy operations stay under your control.